Hi All
Hello and welcome to this week’s CASEing the Catty Blog Hop.
This week we are taking our inspiration from pages 30-33 of the Occasions Catalogue – which includes the luxurious Shine On Specialty Designer Series Paper (DSP) and two fabulous project kits – You’re So Lovely and Enjoy the Little Things.
Whether you’re joining the Hop here, or if you’ve hopped on over from Liz – a BIG hello!
Remember to click on through this week’s CTC crew to see plenty of inspirational projects that the crew have created for you – there’s a full list on the CTC blog page if you get lost along the way.
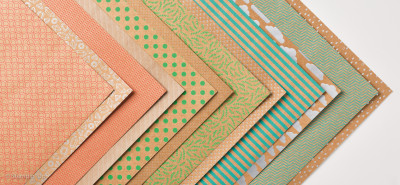
This Shine On DSP is Kraft paper base with printed patterns on both sides. One side is printed in one of three colours (Bermuda Bay, Watermelon Wonder or Cucumber Crush) while the other side on all the sheets is printed in silver foils designs – six different ones. This combination makes the DSP really versatile!
Here’s a picture showing all 12 patterns – and you get two of each in your 12 sheet pack!
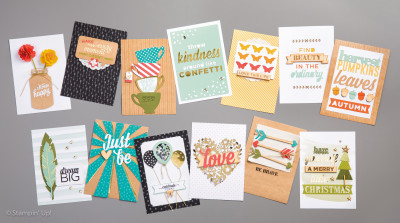
I fell in love the Enjoy the Little Things Project Kit as soon as I saw it. I think the sentiments conveyed are positive and uplifting – and who doesn’t need that! I get to see my completed clipboard everyday as it is in my craft studio. It’s great being able to change the display regularly. I CASE’d page with the nine butterflies way back in January – you can check out that blog post HERE.
So I decided to take another of the display pages and CASE it using the Shine on DSP for this week’s challenge – can you pick which page I CASE’d?
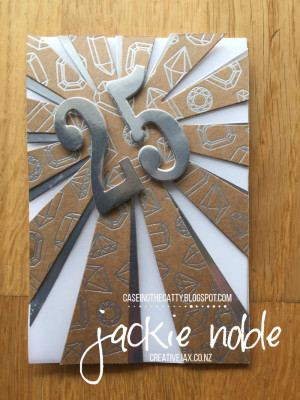
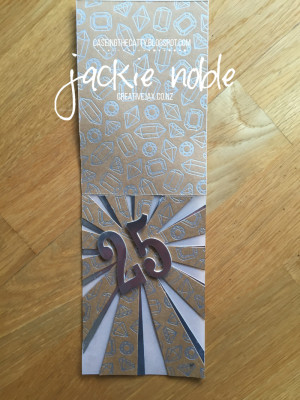
While diamonds are traditionally given for the gold 50th wedding anniversary, I thought that a 25th Anniversary was worthy of gems and the DSP was perfect!
While the Enjoy the Little Things Kit has pre-cut pieces for the sunburst (and everything else!) recreating it in the Shine On DSP and Silver Foil was a breeze with the Sunburst Framelit Dies.
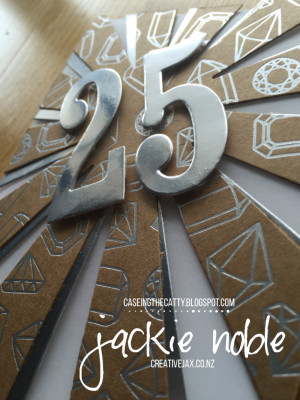
The photo above doesn’t really show the shine that the DSP and foil have – so here’s a close-up at a different angle.
How amazing do those silver foil numbers look? While I haven’t used them for the front of the card, the Large Number Framelits have a matching stamp set – Number of Years. The stamp set and framelits are available individually or as a number bundle at a 15% discount. I did use the stamp set for the sentiment on the inside of the card.
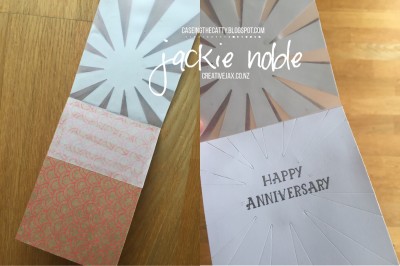
I carried the DSP through to the back of the card too.
What you can’t really tell from the above photos is that the card front is vellum! Here’s a couple of photos in different light to show you what I mean.
Adhering vellum poses some difficulties – especially if the back of the vellum is visible, which it is on the inside of this card. So here’s how I went about constructing this card.
Instructions
Two pieces of Shine On DSP – 14.8cm x 10.5cm (1/4 of an A4 size)
Silver Foil – 16cm x 12cm
Vellum – 21cm x 10.5cm – scored at 14.8cm
Whisper White – 14.8cm x 10.5cm (1/4 of an A4 size)
- Cut a sunburst from the Shine On DSP and the Silver Foil.
- Using Fast Fuse, adhere together with the DSP on top and with a slight offset so that you can see some of the silver foil behind the rays of DSP
- Trim the Silver foil so that none extends past the ends of the DSP rays – i.e. the completed size is 14.8cm x 10.5cm
- Using the Fine-Tip Glue Pen, adhere sunbursts to the larger rectangle of vellum (matches the size of the sunbursts). The Fine-Tip Glue Pen is not visible on the inside of the card – Yay!
- Using Fast Fuse, adhere the smaller rectangle of the vellum to the inside of the card back. Make sure the card front and back are aligned correctly – the edges should form a continuous straight edge so the sides of the card will match when the card is closed.
- Using the Standard Premium Crease Pad instead of the top cutting plate, run your Whisper White sheet through the BigShot with the Sunburst Thinlit The crease pad gives enough pressure to leave an impression of the sunburst on the card stock without cutting it out completely.
- Silver emboss the greeting – this is positioned so as not to be visible through the vellum when the card is closed.
- Adhere the Whisper White card inner to the DSP back of the card – on the inside so the vellum is sandwiched between the Whisper White and the DSP.
- Silver emboss the greeting – this is positioned so as not to be visible through the vellum when the card is closed.
Here’s the inside of the card – both before and after the inner has been adhered.
I had lots of fun making this card and do hope you’ve enjoyed my project for this week’s CTC Blog Hop. Leave me a comment below – it’s great to hear from you out there 🙂
And remember – CASEing the Catty is running a monthly challenge – so you can play along too!
We’d love you to share your own project that takes inspiration from pages 30 to 33 of the Occasions Catalogue. Just click on the Join Challenge Button below and you can add your project at the linky you will find at the bottom of the post.
A winner will be chosen and announced on the first post of the following month.
Now hop on over to Simone’s blog to check out her stunning birthday card!
And remember if you get lost along the way – head to the CTC Blog Home Page where you will see all those involved in this week’s CASEing the Catty Blog Hop and make sure you haven’t missed any of the great creations!
Thanks for stopping by and hope you enjoy all the other posts in the hop!
 Until next time
Jackie
I hope you enjoyed this post,
As always – if you wish to know anything more about info in this post, or to get a catalogue, or to buy any of the items mentioned in the post, please contact me.
Or you can shop 24/7 at my online Stampin’ Up! shop – just click on any of the products in the table below, and you should find yourself in my online shop at the page with information about the product.
Please do use the hostess code to support creativeJax if you are ordering online! Entering the Hostess code combines the value of online orders – which assists me to offer events and thank you’s for my customers and support charities such as Ronald MacDonald House and local events where I donate product and/or classes.
The current Hostess Code can be found at the top right of my webpage.
If your order is over $350, please do not use this code as You become the hostess and get the Rewards!
If you would like to find out about joining my Stampin’ Up! Team (thINK Creative) – Please do get in touch – I would love to chat to you about that.
You can receive my Blog Posts directly by email or join my monthly Newsletter group – you can subscribe using the buttons at the right of my page.
Product List






3 comments
Wow, your card is simply stunning!! I love it. I just wish I was turning 25 so you could send it to me!!
Everything about your card is inspirational!! From foil to the starburst to the vellum – it all packs a punch!! And thank you for the amazing tips for construction!!
What a very clever CASE this week, Jackie. Very inventive with your vellum and how you’ve solved the design issues.