

The release of a new Annual Catalogue is an exciting – and busy – time in the Stampin’ Up! year! As well as highlighting those items that are retiring soon, we are busy making samples to share using products that are about to be released. And sometimes – like today’s Blog Hop – we give a Sneak Peek of what we’ve been busy creating!
I’ve got four sneak peek cards to share with you today – two each from two team crafting days. These all feature about to be released products!
thINK Creative Team Crafting Day
In late May I always host a Team Crafting Day for members of my thINK Creative Team so we can get together and create projects using items from the new catalogue. It’s great to spend a day with crafty friends and to get lots of preparation done before the catalogue goes live. At my day last weekend, team members could participate in a Shoebox swap and/or craft freestyle!
My Shoebox swap was a pair of Memories & More cards. To show how quick and simple cards made with Memories & More Card Packs can be, participants got to make a card featuring each of the two available packs (Come Sail Away and Magnolia Lane). Both using the Magnolia Lane Large Specialty Memories & More Cards & Envelopes as their base. Of course, everyone’s finished cards were different as there are many different cards in each pack. Here are the two samples I made
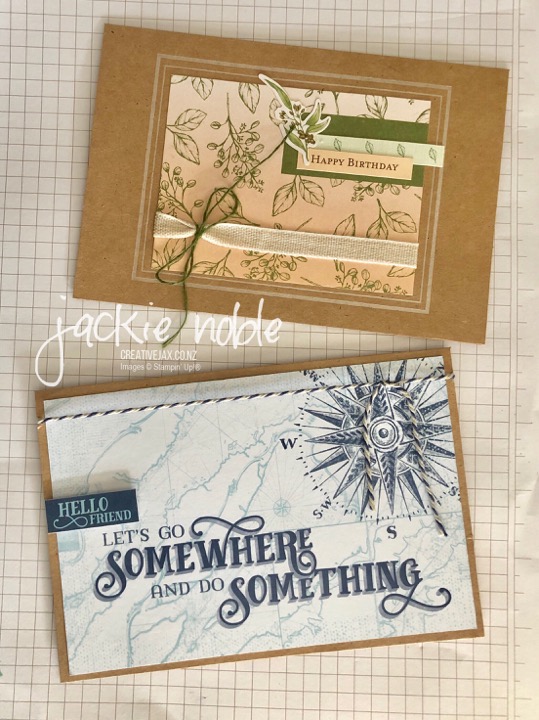
- Stamps: none!
- Ink: none!
- Card: Magnolia Lane Large Specialty Memories & More Cards & Envelopes
- Accessories: Come Sail Away and Magnolia Lane Memories & More Card packs, Baker’s Twine, Magnolia Lane Ribbon Combo
- Adhesives: Multipurpose Liquid Glue, Stampin’ Dimensionals, Glue Dots
- Tools: none!
I love how the kraft card bases are sized perfectly for the Memories and More Cards.
Sally’s Team Crafting Day
Then yesterday, I got to “do-it-all-again” as one of my team members (Sally Wheoki aka Stamped Wishes) hosted another team crafting day! So it was more good company and fun crafting in preparation for the new catalogue!
I offered to do a Make’n’Take as well as my Shoebox Swap, and we agreed I’d feature the Come Sail Away Product Suite. I have made display boards for several of the new suites – including Come Sail Away.
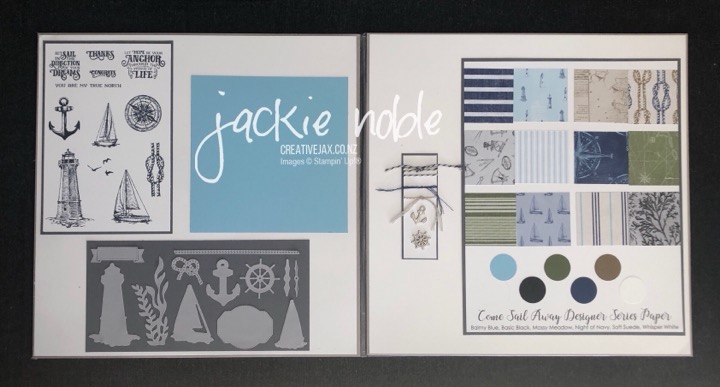
A great way to see all the products in the Suite.
My Shoebox Swap
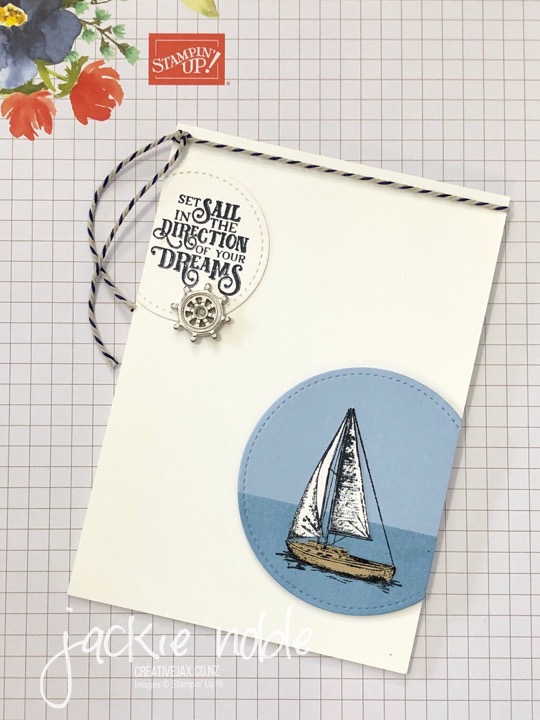
As this was a Shoebox Swap, it was important to have a project that didn’t take too long. So I pre-cut the circles and had post-it notes set in the correct place for everyone to do their sponging of the sea on the larger circle. I had cut this so there was a straight edge which would go along the card edge.
After sponging the sea, the yacht was stamped in Momento Black onto this circle as well as onto scraps of Crumb Cake and Whisper White. The Whisper White sails and the Crumb Cake boat were fussy cut, and then adhered onto the complete boat image with glue. This circle was attached to the card front with dimensionals.
The sentiment was stamped onto the smaller white circle, close to one side. This was glued to the front of the card so that the sentiment was straight and a small amount of the circle hung off the edge of the card. I trimmed this excess off, attached the embellishment with glue dots and tied the Baker’s Twine around the card.
Inside the card the compass image was stamped in Crumb Cake.
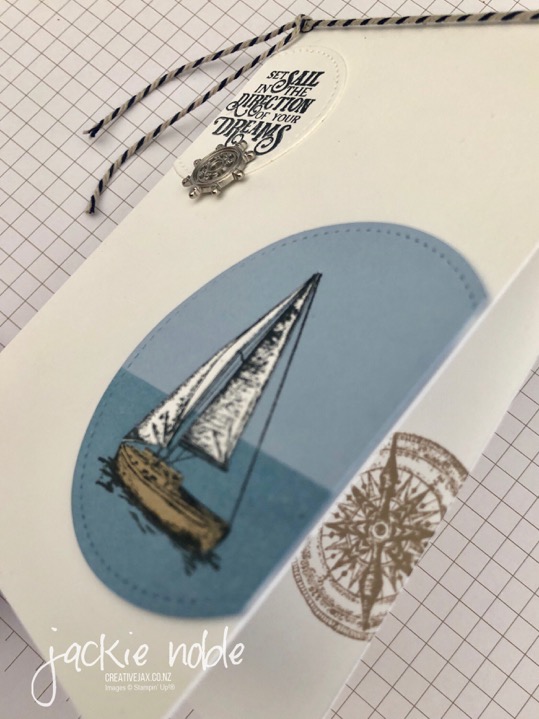
- Stamps: Sailing Home
- Ink: Seaside Spray, Basic Black, Crumb Cake
- Card: Thick Whisper White, Seaside Spray, Crumb Cake
- Accessories: Baker’s Twine, Sail Away Trinkets
- Adhesives: Multipurpose Liquid Glue, Stampin’ Dimensionals, Glue Dots
- Tools: Stitched Shapes Dies, Paper Snips
And lastly – my Make’n’Take:
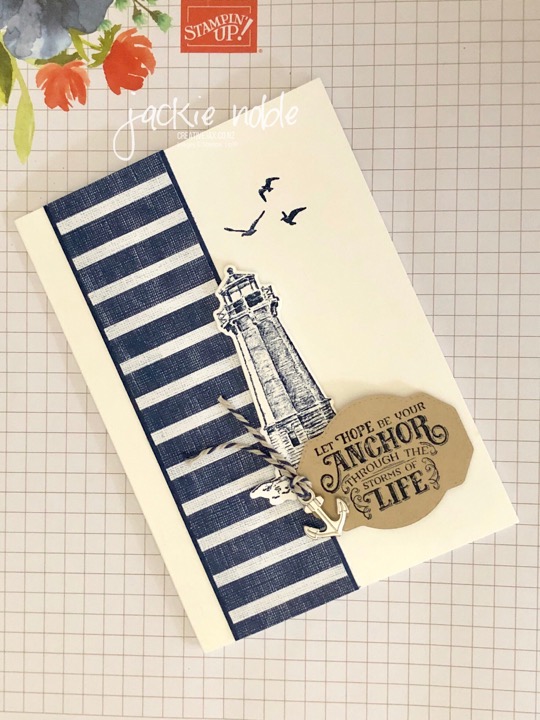
- Stamps: Sailing Home
- Ink: Night of Navy
- Card: Thick Whisper White, Night of Navy, Balmy Blue, Crumb Cake
- Accessories: Baker’s Twine, Sail Away Trinkets, Come Sail Away Designer Series Paper (DSP)
- Adhesives: Multipurpose Liquid Glue, Stampin’ Dimensionals, Glue Dots
- Tools:Smooth Sailing Dies, Stamparatus
The DSP was matted onto Night of Navy and then attached to the card front with glue. To be time efficient and ensure all the stamped diecuts were lined up correctly, I had again pre-cut all the die shapes and set up a template to be used on the Stamparatus to do the stamping with.
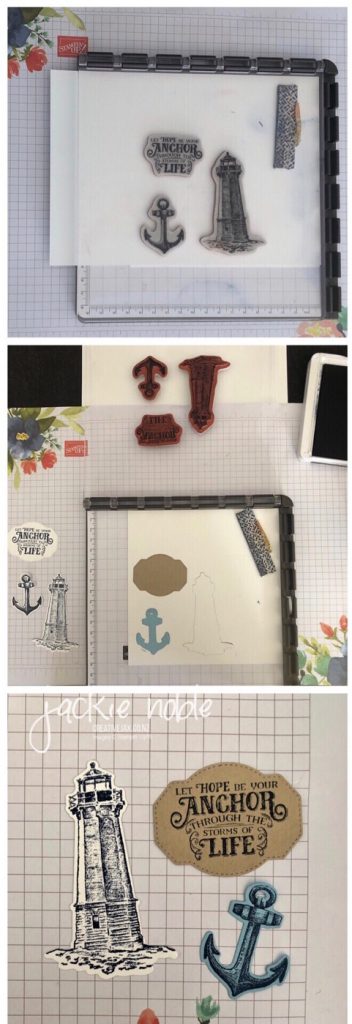
To make this, I firstly stamped all three of the images that would be die cut onto a large piece of Whisper White. I then diecut these images which left a space where each person could place their diecuts and stamp all the images at the same time.
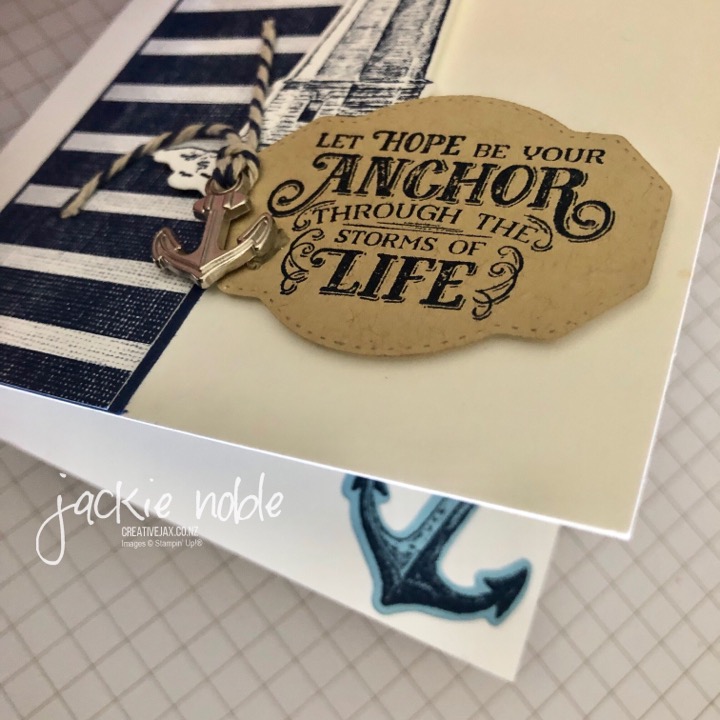
The lighthouse and label were adhered to the card front with dimensionals and the anchor to the inside of the card with glue. Finally a piece of Baker’s Twine was tied to the anchor from the Sail away Trinkets and attached to the card with glue dots.
I’ve had fun making these cards, fun seeing others make them at team crafting days, and fun now sharing them with you!
I’m sure this Come Sail Away Product Suite is going to be a very popular item when the catalogue goes live on Tuesday 4th June.
It’s time to check out more fabulous Sneak Peeks!
Blog hop participant list:
- Lou Kitzelman
- Rochelle Blok
- Kelly Kent
- Jo Stubbings
- Nicole Wilson
- Denise Buetler
- Sandra Mastello
- Rochelle Laird-Smith
- Siobhan Fitzsimmons
- Shannon Kissane
- Libby Dyson
- Jo Weedon
- Peta Stephen
- Carly Middleton
- Lisa Whitehead
- Bronwyn Eastley
- Cathy Pinchbeck
- Monique Fielder
- Rebecca Scurr
- Richelle Fletcher
- Jackie Noble – You Are HERE
- Mandy Depiazzi
- Sharon Dalton
- Maree McIntosh
- Samantha White
If you live in New Zealand and would like a copy of the new 2019-2020 Stampin’ Up! Catalogue – contact me for details Email Me
Looking for inspiration from a group of Global Demonstrators – try the “All Star Tutorial Bundle”.
SHOP WITH ME
BUY THE TUTORIAL BUNDLE
Purchase the Tutorial Bundle for $NZ21
Note: the tutorial will be sent to the email address listed on your PayPal account within 48 hours
REMEMBER
- If you live in New Zealand and would like a copy of the new catalogue, please contact me.
- If you live in New Zealand and would like a demonstrator to order through – I’d love to have you join my group of crafty customers. Let’s journey together! – Shop Now or contact me.
- If you live in New Zealand and would like to know more about becoming a demonstrator – Check out the info HERE. I’d love to have you join my thINK Creative Team!
Until next time
As always – if you wish to know anything more about info in this post, or to get a catalogue, or to join my thINK Creative Team, or to buy any of the items mentioned in the post – please contact me.
Or you can shop 24/7 at my online Stampin’ Up! shop – the table below shows you what products I used. Just click on each to see more information.
Please do use the hostess code to support creativeJax if you are ordering online!
Entering the Hostess code combines the value of online orders – which assists me to offer events and thank you’s for my customers and support charities such as Ronald MacDonald House and local events where I donate product and/or classes.
The current Hostess Code can be found at the top right of my webpage.
If your order is over $300, please do not use this code as You become the hostess and get the Rewards!
If you would like to find out about joining my Stampin’ Up! Team (thINK Creative) – Please do get in touch – I would love to chat to you about that.
You can receive my Blog Posts directly by email or join my monthly Newsletter group – you can subscribe using the buttons at the right of my page.







27 comments
Skip to comment form
Great projects using this suite
In a nutshell- I love it all!!!! So much inspiration here, Jackie. I would love to case your display board if I may – it’s fantastic and I could use it as a template for other suites too. Thank you so much for sharing xxx
You’ve been busy!! Thanks for sharing your creations with us!
Author
Thanks Carly – I love quick and simple!
Author
Thanks Rebecca! I Love quick and simple!
Author
Thanks Jo. The template sure kept things moving along.
Author
Thanks Libby!
Author
Thanks Kelly – the feeling is mutual!
Author
Thanks Rochelle! I just had to careful to keep my horizon flat – lol!
Author
Thanks Jo!
Author
Thanks Peta! I’ve had larger display boards in the past – but wanted to make some compact portable ones this year.
Author
Thanks Mandy!
Author
Thanks Siobhan! lol – I just couldn’t cope with see-through yachts on the card!
Author
Thanks Rochelle!
Author
Thanks Lou!
Oh wow Jackie. So striking. Love all of these. x
Great set of cards. Love your layouts of the Come Sail Away cards. Great idea to specify that no ink was used – another way to create simple projects.
I was sure I wasn’t going to like this suite at all but these are SUCH beautiful creations you are twisting my arm!! The colouring and piecing of the yacht are next level – it looks sooooo good. – Siobhan.
Some wonderful cards here, its a great reminder to use the memories and more cards. I absolutely love the trinkets and twine from the sail away suite.Thanks for sharing your wonderful ideas.
Great cards Jackie, this is my favourite new suite. Your display board is such a good idea, I might have to case it.
Love your Sailing Home projects, some really nice cards there! Thank you so much for sharing!
Fabulous cards Jackie! Love the use of the M & M card packs for the first cards. The sponging on the circle is a fabulous way to create that water look and the fussy cutting of the yatch really adds to the gorgeous look to your card. Thanks for sharing! Rochelle xo
I always love seeing what you’ve been up to Jackie Thanks for sharing your ideas. Kelly x
Great projects, Jackie. A wonderful selection using this great suite. Thanks for sharing
I love the template idea to help the participants line up the stamping images!! Pfft, I love it all!!
Love all your samples! I love how the Memories and More cards don’t need anything else to make them pop
Great lot of cards here, and love that some use no stamp or ink, great up sell opportunities which I forget about.