CASEing The Catty Blog Hop – CTC107 – Favourite Holiday Punch Bundle

Hello and welcome to this week’s CASEing the Catty Blog Hop!
CASEing the Catty Blog - CTC104 - Petals & Paisleys

Whether you’re joining the Hop here, or if you’ve hopped on over from Monique at Stamping with MoniQ  – or back from Kelly at My Papercraft Journey  a BIG hello!

Remember to click on through this week’s CTC crew to see plenty of inspirational projects that the crew have created for you – there’s a full list on the CTC blog page  if you get lost along the way.


This week the crew is taking  inspiration from one of the fab Punch bundles in the Holiday Catalogue! There’s a few – and some have made it onto the carryover list, so will be available after the Holiday Catalogue finishes on 3 January.


 I’ve combined two of the punch Bundles in my project this week.


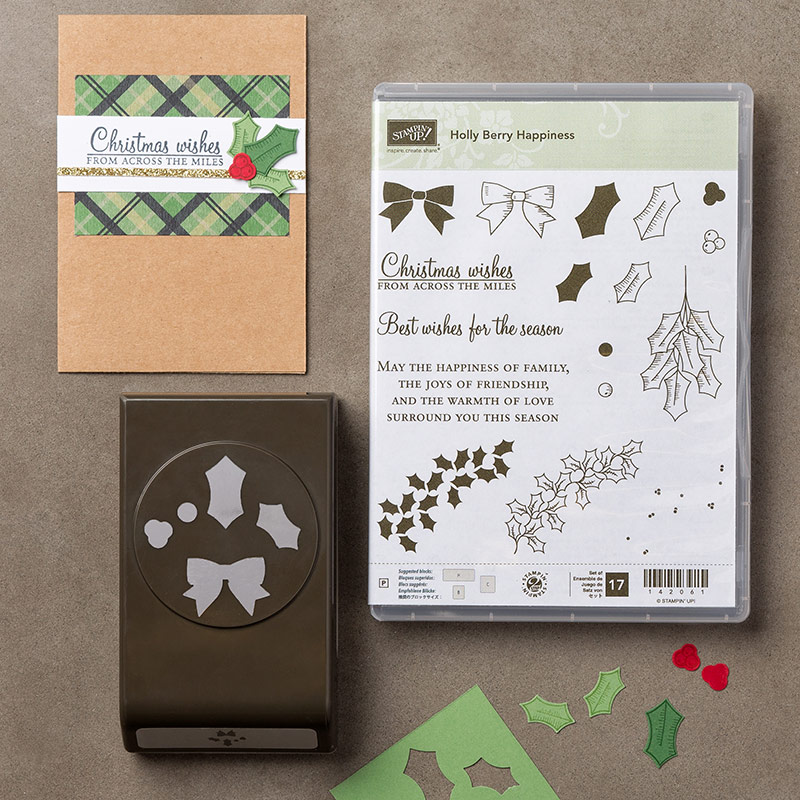
I’m using the Holly Berry Punch Bundle – love all the little elements included in the both the punch and the stamp set. This makes it a very versatile set. In fact – did you know that the punch also matches the 2-step bow stamp in the Baby Bear stamp set from the Annual Catalogue.

Holly Berry Bundle

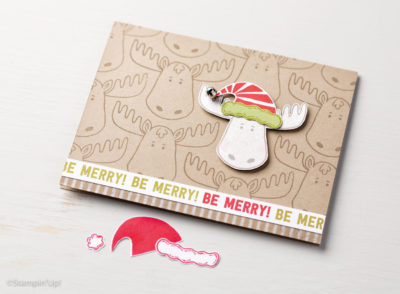
And I’ve CASE’d my Hubby’s favourite card from the Holiday catalogue – the moose card found on page 29 of the catalogue.
holiday16_p28a-25

We love the clean lines of this layout. How can you resist that moose?

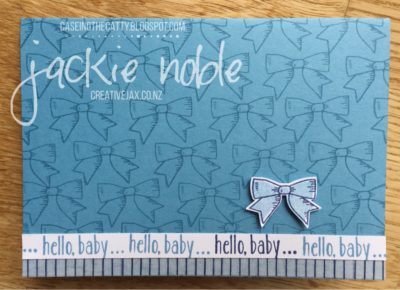
My CASE uses the bow image and Punch to create a cute baby card.

2016_12_creativejax_ctc107_punch_bundle

The card base and background bows are in Marina Mist, while the raised single bow is on Whisper White card, stamped in Night of Navy (outline) and Marina Mist (fill). A couple of dimensionals behind the loops makes the bow pop off the page.

Those stripes along the bottom are one of the washi tapes from the Floral Boutique Designer Series Washi set.

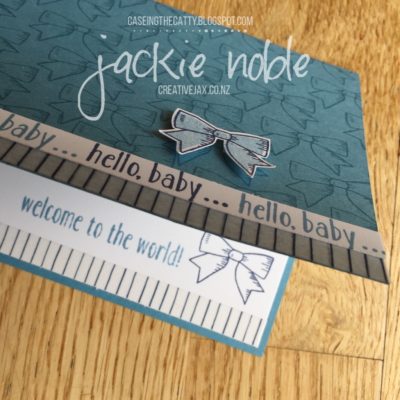
The 1cm strip of Whisper White has one of the sentiments from the Baby Bear set – stamped repeatedly in Marina Mist – with one on Night of Navy.

And here’s a peek of the inside of the card – ‘cos you just have to decorate that too – don’t you?

2016_12_creativejax_ctc107_punch_bundle_inside

I do hope you’ve enjoyed my project this week!

Feel free to leave me a comment in the section below – love hearing from you!

As always, CASEing the Catty is running a monthly challenge – so you can play along too!

We’d love you to share your own project that takes inspiration from one of the punch bundles in the  Stampin’ Up! 2016 Holiday catalogue. Just click on the Join Challenge Button below and you can add your project to the linky you will find at the bottom of the post.

December CTC Challenge

A winner will be chosen and announced on the first post of the following month.


Now depending on the direction you’re hopping–  hop on forward to the next blog – Kelly at My Paper Craft Journey  – or go back to the Previous Blog – Monique at Stamping with Moni-Q.

Monique  Kelly

And remember if you get lost along the way – head to the CTC Blog Home Page where you will see all those involved in this week’s CASEing the Catty Blog Hop and make sure you haven’t missed any of the great creations!

Thanks for stopping by and hope you enjoy all the other posts in the hop!


Logo 72ptUntil next time


Jackie

I hope you enjoyed this post,

Stampin’ Up! Promotion:

As the year draws to an end, the Holiday Catalogue is only with us for a few more weeks. Stampin’ Up! have advised which products will be available beyond when the catalogue finishes. You can check out the “Carry Over List” here

Many of the retiring items are now on sale – you can check the complete list here – though availablitiy of some items may change at any time as products are while stocks last.

yearendcloseout_shareables_eng_5

In addition to retiring items being on sale – Stampin’ Up! is clearing out overstocked items and the clearance rack and there are many items now on Sale – including some at 60% discount!

Click on the Closeout Sale image above to check out everything that is available.


As always – if you wish to know anything more about  info in this post, or to get a catalogue, or to buy any of the items mentioned in the post, please contact me.

Or you can shop 24/7 at my online Stampin’ Up! shop – just click on the items in the table below or click the “Shop Now” button at the Top Right of the page.

Product List


Please do use the hostess code to support creativeJax if you are ordering online!  Entering the Hostess code combines the value of online orders – which assists me to offer events and thank you’s for my customers and support charities such as Ronald MacDonald House and local events where I donate product and/or classes.

The current Hostess Code can be found at the top right of my webpage.

If your order is over $300, please do not use this code as You become the hostess and get the Rewards!

If you would like to find out about joining my Stampin’ Up! Team (thINK Creative) –  Please do get in touch – I would love to have you on my Team.

You can receive my Blog Posts directly by email or join my monthly Newsletter group –  you can subscribe using the buttons at the right of my page. 

Permanent link to this article: https://creativejax.co.nz/2016/12/stampin-up-ctc107-holly-punch-bundle/

ESAD – Favourite Holiday Catalogue Products Blog Hop

Hi All

14976641_10155369545259428_3923198768787210938_o

Welcome to the ESAD Holiday Catalogue Blog Hop.  We are so excited to be able to show you some of our favourite products from the Stampin’ Up! Catalogue.

ESAD InformationI may have mentioned it before – but in case you’ve missed it – Christmas is my FAVOURITE time of the year! There are so many things I love about the Festive Season – and Christmas crafting and memory keeping are two of my favs!

You may just be starting the blog hop here at my blog – Jackie Noble – or may have come from the person previous to me in the list. If you get off track at any time, the full lineup below will help you move along from blog to blog so you see all the projects.
Another hard choice – I do have lots of favourites!
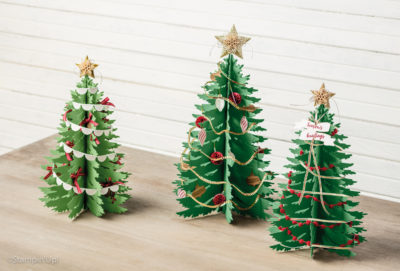
I finally settled on the Forever Evergreen Kit.
Here they are fully trimmed!
holiday16_142994_2-146
 And the Kit is included in the current Stampin’ Up! Online Extravaganza which runs until the end of Monday night (28th November).
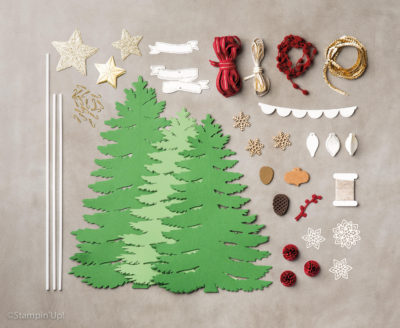
 This image of the kit contents give you an idea of the numerous items included.
holiday16_142994-96
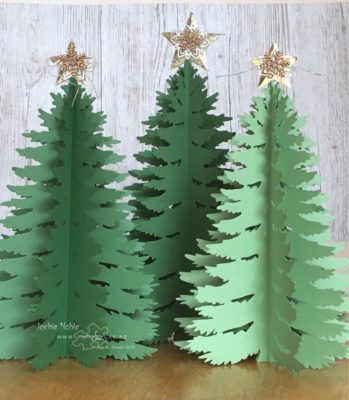
I have not trimmed my trees – I love the elegant lines of the trees and am enjoying them with no decorations – well apart from their stars!
creativejax_esad_nov_2016_evergreen_trees
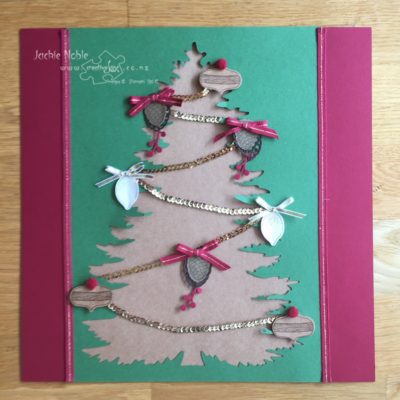
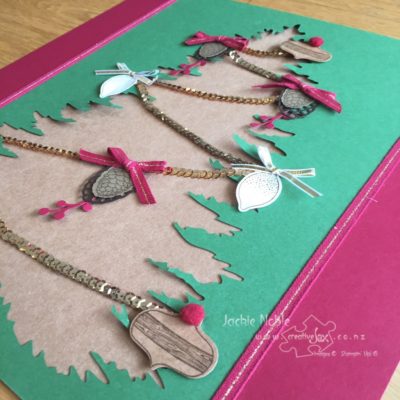
Each tree is made from eight (8) identical pieces which are – in Garden Green and Pear Pizzaz. So you are left with the negative shape after the tree has been pressed out, and I’ve put those to use in my projects today.
First up a wall hanging – please excuse some of the colours. The light just wouldn’t play nicely today! These really are Cherry Cobbler and Garden Green!
creativejax_esad_nov_2016_frame2 creativejax_esad_nov_2016_frame3 creativejax_esad_nov_2016_frame
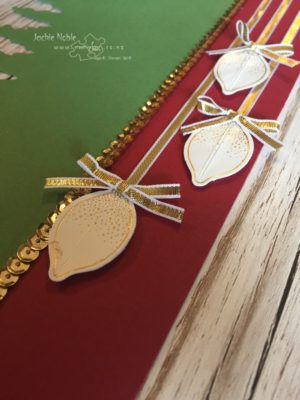
My second project using the “off-cuts” is a scrapbook page. Well a title page ready for my Christmas photos!
So often photos are taken but not displayed – so this year I’ve started getting my album ready before the Festive Season.
creativejax_esad_nov_2016_scrap_page1 creativejax_esad_nov_2016_scrap_page3 creativejax_esad_nov_2016_scrap_page2
There is a Window sheet in the negative space to made the opening more stable.

Thanks for checking out our blog hop, there are heaps of inspiration you don’t want to miss.

Remember that currently you are at my blog – Jackie Noble –  click on the Next button and you’ll see what the fabulous Josie Dean has created.

Josie Dean

Here’s a list of all the fabulous ESAD Members in the Hop – click away!

Logo 72pt
Until next time


Jackie


I hope you enjoyed this post,

As always – if you wish to know anything more about  info in this post, or to get a catalogue, or to buy any of the amazing Stampin’ Up! products, please contact me.

You can also shop 24/7 at my online Stampin’ Up! shop – just click on Shop Now button over on the righthand side.

Please do use the hostess code to support creativeJax if you are ordering online!  Entering the Hostess code combines the value of online orders – which assists me to offer events and thank you’s for my customers and support charities such as Ronald MacDonald House and local events where I donate product and/or classes.

The current Hostess Code can be found at the top right of my webpage.

If your order is over $300, please do not use this code as You become the hostess and get the Rewards!

If you would like to find out about joining my Stampin’ Up! Team (thINK Creative) –  Please do get in touch – I would love to chat to you about that.

Permanent link to this article: https://creativejax.co.nz/2016/11/esad-favourite-holiday-catalogue-products-blog-hop/

Thailand Achievers November Blog Hop – Highlights of On Stage Live – Brisbane

thailand-grand-vacation-blog-hop

Hi All!

Welcome to the Thailand Incentive Trip Achievers Blog Hop for November.

This hop is with top demonstrators from around the world who have achieved the amazing Stampin’ Up!® Incentive trip. Those hopping today are all Stampin’ Up!® Demonstrators from all around the world who have met the requirements, and earned the amazing Stampin’ Up! Incentive trip – while everyone can try, only a limited number of demos (less than 1% of all demonstrators) reach the level required to earn the trip each year.

You may just be starting the blog hop here at my blog – JACKIE NOBLE – or may have come from the person previous to me in the list. If you get off track at any time, the full lineup below will help you move along from blog to blog so you see all the projects. 

This month our theme is the “Onstage Highlights”.

emailsig_onstage2016_aug0916_eng

November and April are both special months in the Stampin’ Up! calendar as that’s when On Stage is held.

What is On Stage I hear you say? It’s the gathering of Stampin’ Up! demonstrators and staff around the world where we craft, talk business, share ideas, celebrate achievements and launch new catalogues. Getting to go to On Stage is definitely one of the best “perks” of being a demonstrator – they’re not open to anyone else! If you’re keen to get to the next one in six months time, talk to me about how! I’d love to have you in my thINK Creative Team and join me at On Stage Local next year in Auckland – April!

The three-day On Stage Live event was held in Brisbane form 3 -5 November and for the first time at one of these events my family was coming along – mostly for a holiday – but also as support.

Stampin’ Up! events are always welcoming, professional, educational and fun! It’s great to see ‘old’ friends and meet new ones too! And On Stage Live 2016 was no exception.

There’s lots to share – but today I’m only going to share two of my highlights – recognition and a presentation. Remember – next time you’ll just have to be there in person!  I’ll cover some of the other fabulous things in my upcoming posts but these first two were pretty amazing for me personally!

While On Stage formally started on Thursday morning – mine began on Wednesday afternoon with a rehearsal! I’d been asked to be a Showcase Stamper and present live – on the main stage – in front of more than 600 people! Here’s the set-up back stage before I head out.
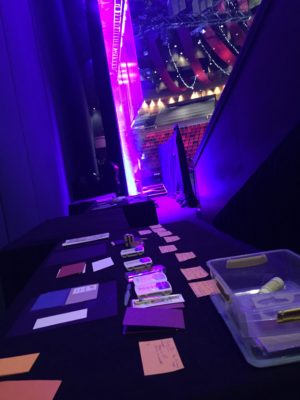
backstage

Rehearsal in the huge auditorium with just the sound & technical crew and an audience of three was a little strange but I was pleased to get that out of the way.

Thursday saw many fabulous presentations, announcements and the first round of recognitions.

When we first arrived and collected our On Stage bag & name tags on Thursday there were also ribbons for those who had reached set milestones in the areas of Sales, Recruiting, Leadership and Flex Points. These awards were known before we got to On Stage & I was delighted to gain Level 1 awards for Sales and Leadership, and Level 2 awards in Recruiting and Flex Points. Level 2 in Flex Points is required to earn the Incentive Trip and my Thailand pin was in my registration pack!
thailand-pin

I’m honoured to be one of only four New Zealander’s who earned this and will be going to Thailand next year.

After a full day of presentations, I attended the Leadership dinner accompanied by Roy. It was great to be able to share the evening with him. More about this evening in a future post.

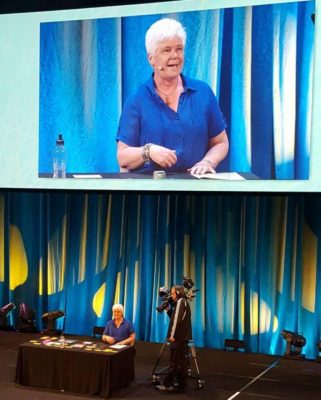
Friday saw more presentations – including mine!
presentation-stage


I was fortunate to be assigned an amazing new Stamp set to showcase – Beautiful You. This is not yet available to order but will be on 4 January for the public – and even earlier for Demonstrators – from the 1st December. This early access to new products is another a great reason to sign up as a demo!

Our brief was to make some samples and describe how we might use our set in our set in our business. As I do several different types of classes each month I made several samples to illustrate how I could use the set.

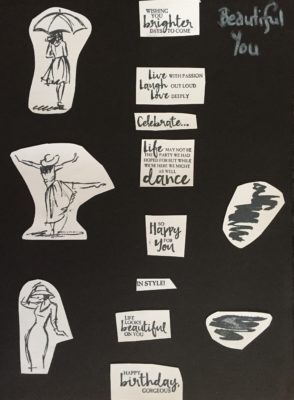
Here are the stamped images – 3 sketches of girls/women, 2 brush stroke images and 8 sentiments. A stunning set that lends itself to many different uses and techniques.
beautiful-you-stamps

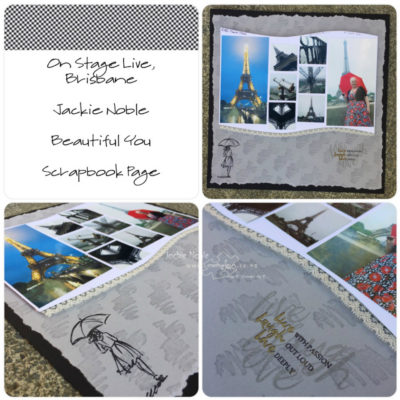
First up a scrapbook page using one of the brushstrokes as a background image – here’s a shot of the big screeen!presentation-scrapbook
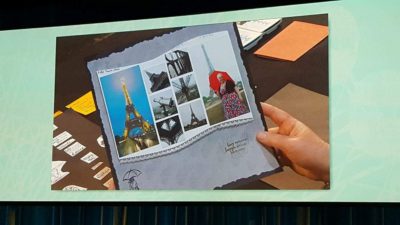
The set also coordinates with several of her stamp sets – including the sentiments of Layering Love from the annual catalogue. “Umbrella Girl” is a stunning image all on her own!
creativejax_2016_11_scrapbooking

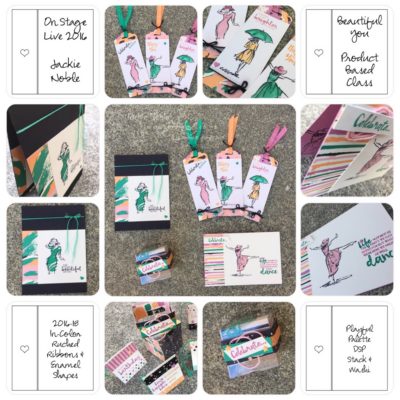
Next up, a product based class pairing the Beautiful You stamp set with products from the Playful Palette product suite.
creativejax_2016_nov_productbased

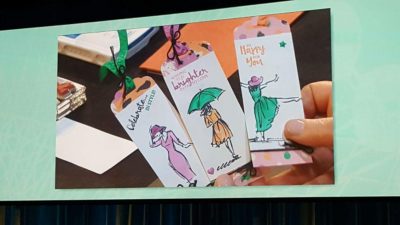
That background brush stroke from the scrapbook page is really designed to fit one of the dresses (see images on left of photo). I watercoloured the dresses in the set of tags (top) with an aqua painter –  though I’m really looking forward to getting my hands on another new product – watercolour pencils! There is also a card featuring stamping on DSP and fussy cutting the image (right). The 4th project in my Product Based Class is  a 3D item (bottom) – a mini treat box containing 4 tiny tags showcasing washi tape and several of the sentiments stamps inked with markers to get the words required. I will be offering this as a “Class to Go” when the new Occasions Catalogue goes live. Classes to Go for some currently available sets will be announced soon – so join my Newsletter to find out all the details as soon as they are available! (Click the button over to the right!)

Here’s another shot of my big screen action!
presentation-tags

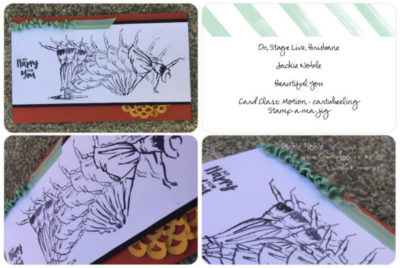
The third class sample is for my card class where I usually do two cards – one showing a technique. As soon as I saw the sketch of the girl dancing I thought she looked as if she was about to do a cartwheel and that got me a thinking…
creativejax_2016_11_cartwheel

I used a Stamp-a-ma-jig to align each image and masked the stamped images each time I added a new one. Quite fiddly but so worth it.

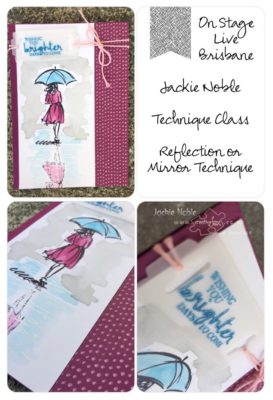
I then shared a way of using the Beautiful You set in a Technique Class. As you can see from the above samples, there are lots of techniques that the set is good for, but for my presentation, I chose the Reflection or Mirror Technique.
creativejax_2016_nov_technique

That umbrella-holding girl was crying out to be walking through a puddle which had her reflection in it!

The last class I made a sample for, was a Fancy Fold Class. The pop-up twist card provides a perfect format to showcase all three sketches images together and I’ve used the stamping on DSP technique again.
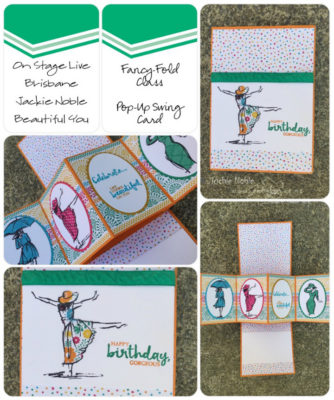
creativejax_2016_11_pop_up_card

Beautiful You is a stunning and versatile set that I believe is going to be very popular!

If you are in New Zealand and wish to purchase the set as soon as it is available – contact me. I will be providing a pdf tutorial for everyone that purchases the set from me as well as having some Classes to Go options.

My presentation went without a hitch and was well received. Thanks to everyone who took the time to talk to me after I’d presented –  I did appreciate your comments.

I didn’t think the day could get much better after the presentation – but it did!

One of my business goals for the year was to make the top five demonstrators in New Zealand in at least one of the three categories – Sales, Recruiting or Leadership –  and to make it into the overall Top 10 Demonstrators in New Zealand. I’d set the bar pretty high but have enjoyed working towards these goals throughout the previous year.

I was a little overwhelmed, to say the least, when the placings were announced and I achieved the following:

Recruiting: # 2 in New Zealand

Sales: # 4 in New Zealand

Leadership: # 3 in New Zealand

Overall: # 2 in New Zealand!

More ribbons for our name badges – which were getting rather long by this point!
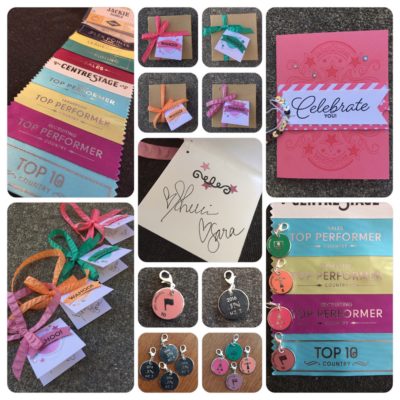
top-achievers

And for each award, recipients received a decorated gift box, with a cute wee card signed by Shelli and Sara, which contained an engraved sterling silver & enamel charm relating to the award earned – WOW! On the reverse side – the year, our initials, country and ranking earned were engraved!

Each Achiever will also receive a personalised jacket! What fabulous keepsakes!

I really do love what I do – but as I have said before I could not have achieved those results without the support of my customers, husband & family, my team and Stampin’ Up!  A very sincere thank you.

So those are the first highlights I wanted to share – there are lots more!

Oh and we also received copies of the yet-to-be-released Occasions Catalogue – one word – FAB-U-LOUS! Getting access to the catalogue and new product first is definitely a huge advantage of being a demo but these projects will be one of the few posts I’ll do in the upcoming weeks about the Occasions Catalogue. I’ve still got so much Christmas Crafting to do! And “Christmas is the most Wonderful Time of the Year” – we don’t want to miss any of it!

Thanks for taking part in our blog hop, there are so many amazing ideas and inspiration you don’t want to miss. Remember that currently you are at my blog – JACKIE NOBLE – so check the blog hop line up list to see who is next in the list.


If you would like any information about the products I’ve used in my project – as always they’re listed in the table below.

Feel free to leave me a comment below – I love hearing from you!

If you live in new Zealand and would like a Stampin’ Up! Demonstrator to order through – and or are interested in finding more out about joining my thINK Creative Team – please contact me. I’d love to have you join my group of crafty friends – let’s journey together!

Until next time

Jackie Noble | creativeJaxJackie

As always – if you wish to know anything more about  info in this post, or to get a catalogue, or to buy any of the items mentioned in the post, please contact me.

Or you can shop 24/7 at my online Stampin’ Up! shop 


Please do use the hostess code to support creativeJax if you are ordering online!  Entering the Hostess code combines the value of online orders – which assists me to offer events and thank you’s for my customers and support charities such as Ronald MacDonald House and local events where I donate product and/or classes.

The current Hostess Code can be found at the top right of my webpage.

If your order is over $300, please do not use this code as You become the hostess and get the Rewards!

If you would like to find out about joining my Stampin’ Up! Team (thINK Creative) –  Please do get in touch – I would love to chat to you about that.

You can receive my Blog Posts directly by email or join my monthly Newsletter group –  you can subscribe using the buttons at the right of my page. 
 

Permanent link to this article: https://creativejax.co.nz/2016/11/stampin-up-thailand-achievers-on-stage-live-brisbane/

CASE-ing the Catty Blog Hop – CTC104 – Petals and Paisleys

Hello and welcome to this week’s CASEing the Catty Blog Hop where the crew are taking our inspiration from the Petals & Paisley section of the Stampin’ Up!  Holiday catalogue (pages 46-49).CASEing the Catty Blog - CTC104 - Petals & Paisleys

Whether you’re joining the Hop here, or if you’ve hopped on over from Krissy at Krissy B Cards & Craft – or back from Judy at Just Judy Designs –  a BIG hello!

Remember to click on through this week’s CTC crew to see plenty of inspirational projects that the crew have created for you – there’s a full list on the CTC blog page  if you get lost along the way.

I missed last week’s Blog Hop as I was somewhere over the Tasman Sea – flying back from On Stage Live in Brisbane.

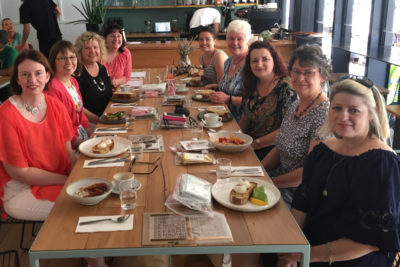
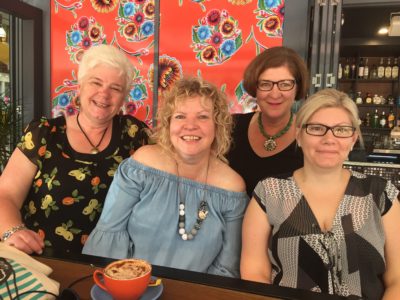
One of the highlights for me was meeting most of the other members of the CASE-ing the Catty Crew! We shared brunch together on the first morning of On Stage. What a fabulous way to kick off a wonderful event.

creativejax_11_13_ctc104_crew_brekkie

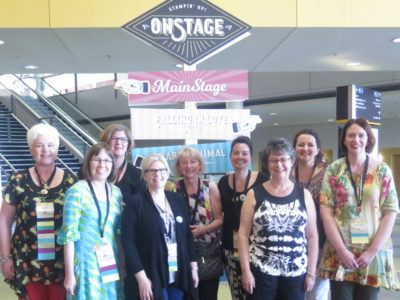
Some of us met up again at various times through On Stage and we managed to get a photo – though the founder of CTC was missing in action!

creativejax_11_13_ctc104_crew

… but back to this week’s Blog Hop!

Well … I couldn’t get past the first page of the section we were looking at.

holiday16_p46_petals_n_paisleys

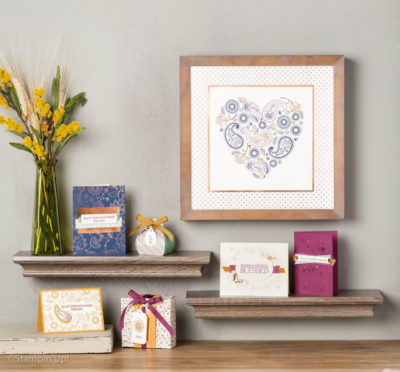
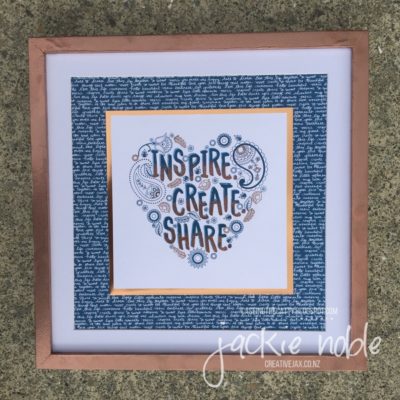
I’ve been keen to make a new frame for my craft studio – so our CTC Hop was the perfect reason!

creativejax_ctc104_petals_n_paisleys

Rather than just use the stunning images from the Paisleys & Posies Stamp Set, I’ve also included the Stampin’ Up! Moto – Inspire. Create. Share.

What a great sentiment, and after attending On Stage it is definitely how I am feeling!

I love all the words on the DSP Stacks of each of the color families so that’s my background. I’ve chosen the Dapper Denim coloured paper from the 2016-2018 In Color DSP Stack to use as my background and have matted my 8×8″ Whisper White onto Copper Foil (8 1/2×8 1/2″12×12″ ) before adhering it onto the DSP.

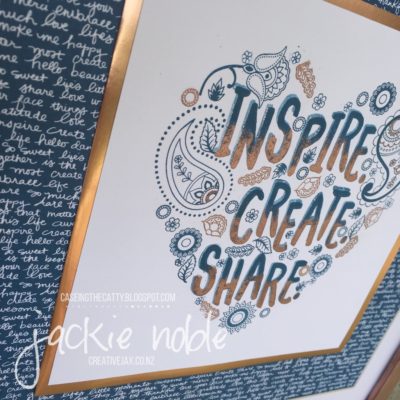
Here’s a closer look.

creativejax_ctc104_petals_n_paisleys_1

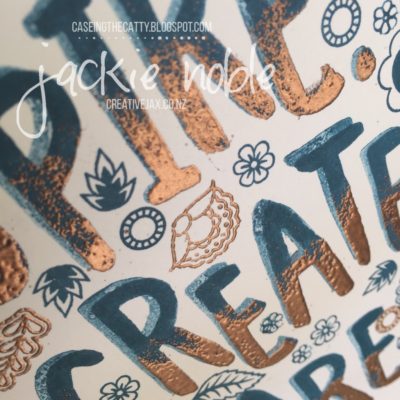
Some of the images are stamped in Dapper Denim and some are heat embossed with Copper Embossing Powder. I cut out a template in the shape of a heart, placed it onto the Whisper White and then stamped all my images within the heart-shaped opening. I did the words first, then the largest of the Paisleys, before using some of the smaller images to get the heart shape.

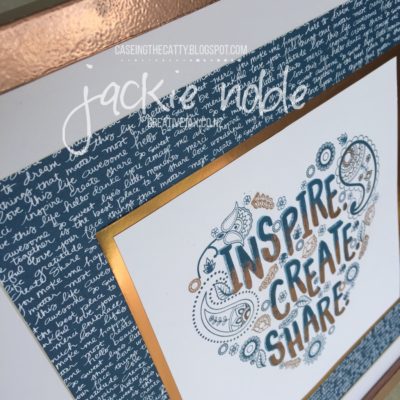
My frame was a white frame – but I really wanted to tie it into the copper foil and copper embossing in the stamping – so decided to try embossing it! It worked. The photos don’t really show – but it is A-MA-ZING! You get just a glimpse of these luscious copper embossed surface in this photo!

creativejax_ctc104_petals_n_paisleys_2

You can’t have too much copper right?!

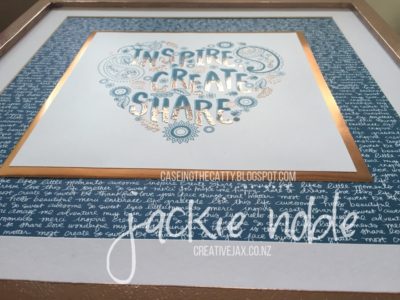
I really wanted to show you the fabulous shine of the Copper Embossing and when I started to write my post I had the frame sitting beside me on the desk. When I glanced over – this was my view!

creativejax_ctc104_petals_n_paisleys_3

If you are wondering how I made the words on the frame – here’s the deal.

I used the Layered Letters Alphabet and tried out the amazing technique that Sara Douglas shared at On Stage. here’s a close up.

creativejax_ctc104_petals_n_paisleys_closeup

I stamped in Dapper Denim after first stamping off, then reinked the stamps and then I added some VersaMark to the bottom part of the letters before I re-stamped  – offsetting the images slightly. Then added Copper Embossing Powder and heat set it.

I’ll be doing a Live feed of this technique on Tuesday 22nd November – Technique Tuesday. So tune in at 1.30pm on Tuesday (that’s 1.30pm New Zealand Daylight Saving Time).  I regularly have Technique Classes on the 4th Tuesday of the month and from this month will be doing a Live Facebook Feed that day sharing a technique. You’ll find my Facebook page at creativeJax

As always, CASEing the Catty is running a monthly challenge – so you can play along too!

We’d love you to share your own project that takes inspiration from the Halloween Night section of the Stampin’ Up! 2016 Holiday catalogue. Just click on the Join Challenge Button below and you can add your project to the linky you will find at the bottom of the post.

November CTC Challenge

A winner will be chosen and announced on the first post of the following month.

One last CTC Crew Photo – from another brunch! Myself, Bronwyn, Liz and Krissy! Great companyt!
img_6173

Now depending on the direction you’re hopping–  hop on forward to the next blog – Judy  – or go back to the Previous Blog – Krissy

Krissy  Judy

And remember if you get lost along the way – head to the CTC Blog Home Page where you will see all those involved in this week’s CASEing the Catty Blog Hop and make sure you haven’t missed any of the great creations!

Thanks for stopping by and hope you enjoy all the other posts in the hop!

Thanks for stopping by and hope you enjoy all the other posts in the hop!

Logo 72ptUntil next time


Jackie

I hope you enjoyed this post,

As always – if you wish to know anything more about  info in this post, or to get a catalogue, or to buy any of the items mentioned in the post, please contact me.

Or you can shop 24/7 at my online Stampin’ Up! shop – just click on the shop now button at the Top Right of the page.

Please do use the hostess code to support creativeJax if you are ordering online!  Entering the Hostess code combines the value of online orders – which assists me to offer events and thank you’s for my customers and support charities such as Ronald MacDonald House and local events where I donate product and/or classes.

The current Hostess Code can be found at the top right of my webpage.

If your order is over $300, please do not use this code as You become the hostess and get the Rewards!

If you would like to find out about joining my Stampin’ Up! Team (thINK Creative) –  Please do get in touch – I would lo

You can receive my Blog Posts directly by email or join my monthly Newsletter group –  you can subscribe using the buttons at the right of my page. 


Product List

Heat Tool

$60.00

Permanent link to this article: https://creativejax.co.nz/2016/11/stampin-up-ctc104-petals-n-paisleys/

CASEing the Catty Blog Hop -CTC102 – Halloween Night

Hello and welcome to this week’s CASEing the Catty Blog Hop.CASEing the Catty Blog Hop - CTC102 - Halloween Night

This week the crew is taking inspiration from the Halloween Night section (pages 50-55) of the Stampin’ Up! Holiday Catalogue.

Whether you’re joining the Hop here at Jackie Noble | creativeJax – or if you’ve hopped on over from Krissy at Krissy B Cards and Craft or back from Monique at Stamping with MoniQ  a BIG hello!

Remember to click on through this week’s CTC crew to see plenty of inspirational projects that the crew have created for you – there’s a full list on the CTC blog page  if you get lost along the way.

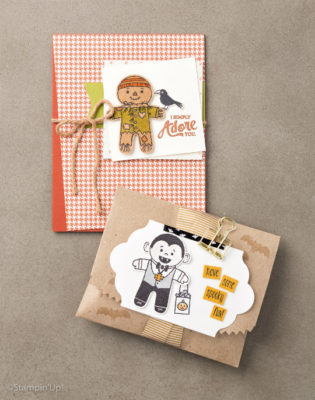
I’ve CASEd the scarecrow card at the top right of page 53:

creativejax_holiday_catty_page53_ctc102

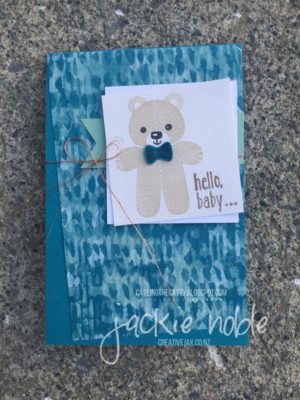
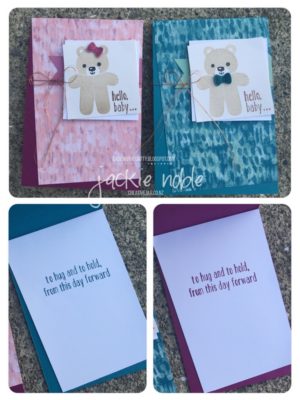
And while I do have some of the Halloween stamps (the influence of living in Canada for a couple of years) – I’ve not gone with a Halloween theme – but rather a baby theme! So instead of the scarecrow – it’s the gorgeous bear from the Cookie Cutter Christmas Stamp Set that features on my CASE!.

2016_10_creativejax_ctc102_bear_boy

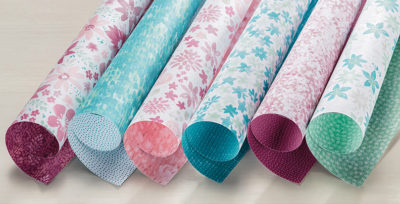
The back ground is the Blooms & Bliss Designer Series Paper (DSP)  – and as the name suggests this et has so much more than Blooms – I think of the reverse sides as the “Bliss”. These abstract patterns that are really versatile. This DSP is one of the eight (8) DSPs that are included in current DSP Sale – Buy 3 Get 1 Free.  But you better be quick – this promotion finishes tomorrow – 31st October. Click on the Image below to see all the details – including which DSPs are on Sale!

bloom_bliss_141654g

There are mixed colours on some sheets of the DSP, as well as two distinctly different palettes. One colour palette – Island Indigo, Mint Macaron, and Whisper White – is perfect to use to create a card welcoming a wee boy into the world.

In my CASE, I’ve kept the layout the same as the original – love that angle of the DSP which is carried through to the smaller pieces of Whisper White card stock. than Kraft Rope Trim though, I’ve used 5 threads of Copper Metallic Thread and continued the copper through to the heat embossed sentiment. How appropriate that I’ve used a sentiment from the Baby Bear Stamp set – another gorgeous set. By inking the words separately, I’ve made it a two line sentiment rather than the single line on the actual stamp.

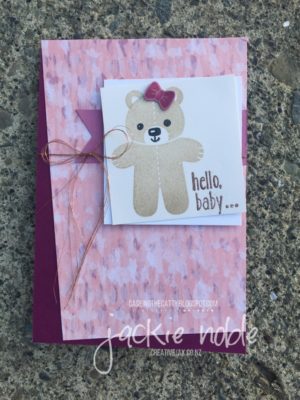
So … why stop at a card for a wee baby boy? Here’s one for a wee baby girl!

2016_10_creativejax_ctc102_bear_girl

Again the DSP is from Blooms and Bliss – and the palette of Rich Razzleberry, Sweet Sugarplum, Blushing Bride and Whisper White is perfect!

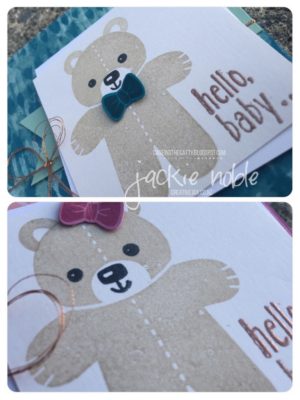
Here’s a close-up of the bears – showing the Copper Embossed “hello, baby …”, the multiple threads of Copper Metallic Thread and the bows – an Island Indigo bow-tie for the boy and a Sweet Sugarplum Hair bow for the girl’s card.

2016_10_creativejax_ctc102_bears_closeup

Aren’t those faces just too cute!

Here are the cards side-by-side and showing the inside words.

2016_10_creativejax_ctc102_bears_inside

… ” to hug and to hold, from this day forward” … nothing else needs to be said!


Hope you enjoyed my project this week!

As always, CASEing the Catty is running a monthly challenge – so you can play along too!

We’d love you to share your own project that takes inspiration from the Halloween Night section of the Stampin’ Up! 2016 Holiday catalogue. Just click on the Join Challenge Button below and you can add your project to the linky you will find at the bottom of the post.

October CTC Challenge

A winner will be chosen and announced on the first post of the following month.

Now depending on the direction you’re hopping–  hop on forward to the next blog – Monique  – or go back to the Previous Blog – Krissy

Krissy  Monique


And remember if you get lost along the way – head to the CTC Blog Home Page where you will see all those involved in this week’s CASEing the Catty Blog Hop and make sure you haven’t missed any of the great creations!

Thanks for stopping by and hope you enjoy all the other posts in the hop!

Logo 72ptUntil next time


Jackie

Stampin’ Up! Promotions

October DSP Special Buy 3 get 1 FREE!

I hope you enjoyed this post,

As always – if you wish to know anything more about  info in this post, or to get a catalogue, or to buy any of the items mentioned in the post, please contact me.

Or you can shop 24/7 at my online Stampin’ Up! shop – just click on the shop now button at the Top Right of the page.

Please do use the hostess code to support creativeJax if you are ordering online!  Entering the Hostess code combines the value of online orders – which assists me to offer events and thank you’s for my customers and support charities such as Ronald MacDonald House and local events where I donate product and/or classes.

The current Hostess Code can be found at the top right of my webpage.

If your order is over $300, please do not use this code as You become the hostess and get the Rewards!

If you would like to find out about joining my Stampin’ Up! Team (thINK Creative) –  Please do get in touch – I would love to chat to you about that.

You can receive my Blog Posts directly by email or join my monthly Newsletter group –  you can subscribe using the buttons at the right of my page. 


Product List

Heat Tool

$60.00

Permanent link to this article: https://creativejax.co.nz/2016/10/stampin-up-ctc102-halloween/

Stampin’ Up! Thailand Incentive Trip Achievers’ Blog Hop – Inspired by Nature

thailand-grand-vacation-blog-hop


Welcome to the Thailand Incentive Trip Achievers Blog Hop for October.

This is our first blog hop with those that have earned the amazing trip with Stampin’ Up!® to Thailand next July. I am so honoured and excited to have earned my second Incentive Trip – Thanks to all who helped along the journey! Those hopping today are all Stampin’ Up!® Demonstrators from all around the world who have met the requirements, and earned the amazing Stampin’ Up! Incentive trip – while everyone can try, only a limited number of demos (less than 1% of all demonstrators) reach the level required to earn the trip each year.

This month our theme is “Inspired by Nature” as many of us live in different areas around the world and have amazing – but very different – seasons that we are enjoying. Plus the nature in Thailand is just incredible so we are inspired by our trip too.

You may just be starting the blog hop here at my blog – Jackie Noble | creativeJax –  or may have come from the person previous to me on the list. If you get off track at any time, the full lineup below will help you move along from blog to blog so you see all the projects. At the moment you are visiting Jackie Noble | creativeJax. 

I consider myself exceptionally lucky to have been born in New Zealand – or Aotearoa – “the land of the long white cloud”. I may be biased, but it truly is an amazing country and one of the things that make it such a great place to live is the abundance and variety of “nature”. For such a small country (268,680 sq km – similar in size to the state of Colorado or to the UK) we have a huge variety of nature in its many forms. Inspiration is all around – from the grand and wondrous to our own backyards. For today’s project and hop I’ve taken inspiration from our garden at home.

It’s Spring in New Zealand. For the last month, I’ve been enjoying my walk to the mailbox – the sight & smell as I walk past the jasmine hedge is amazing! And in the last week our two cherry blossom trees have come into flower – where there were bare trees just a few days ago – we now have an abundance of bunches of white and pink blossoms.

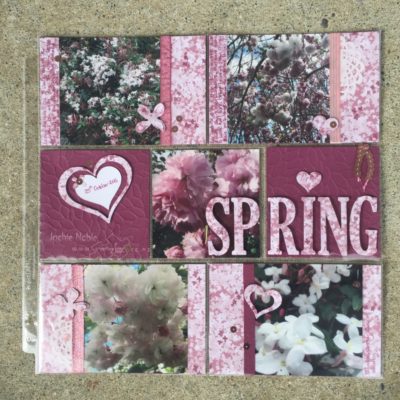
I’ve snapped a few pictures of these stunning plants and rather than leave them on my phone – or somewhere in the sea of social media – I’ve been inspired to create a pocket page celebrating this stunning time.

creativejax_2016_10_thailand_acheivers_bloghop

What better paper to be the backdrop for my jasmine and cherry blossoms than “Blooms and Bliss” Designer Series Paper (DSP). In fact when I first saw this particular pattern way back in the depths of winter when the catalogue was launched – I immediately thought of our blossom trees. Those that know me, know I’m not really a pink sort of a girl, but I love this paper!


The layout is deliberately “busy” – these trees and the jasmine hedge are simply loaded with flowers and I wanted to convey that in the layout.

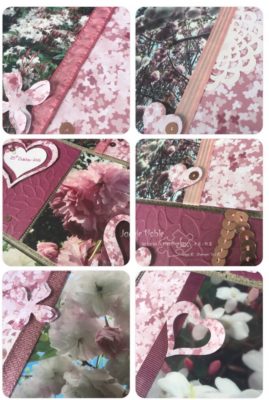
Who knew there were so many shades of pink in just a couple of plants! I’ve used 5 different ribbons that coordinate with the colours in the DSP and in the flowers – Blushing Bride, Sweet Sugar Plum and Rich Razzleberry. The different textures reminded me of the variety of textures in the plants themselves.

I added more texture by running the Rich Razzleberry cardstock through the Big Shot with the Petal Burst Embossing Folder, and by adding a few loose sequins from the Bushing Bride Sequin Trim. The 2015-2017 In Color doilies are white on the back so are really versatile – can you find a couple of them in among the blooms?!


creativejax_2016_10_thailand_acheivers_bloghop1


Thanks for taking part in our blog hop, there are so many amazing ideas and inspiration you don’t want to miss. Remember that currently, you are at my blog Jackie Noble | creativeJax, so check the blog hop lineup list to see who is next in the list.


If you would like any information about the products I’ve used in my project – as always they’re listed in the table below.

Feel free to leave me a comment below – I love hearing from you!

If you live in New Zealand and would like a demonstrator to order through – I’d love to have you join my group of crafty customers – let’s journey together!


Until next time
Jackie Noble | creativeJaxJackie


As always – if you wish to know anything more about  info in this post, or to get a catalogue, or to buy any of the items mentioned in the post, please contact me.

Or you can shop 24/7 at my online Stampin’ Up! shop – just click on any of the products in the table below, and you should find yourself in my online shop at the page with information about the product.

Product List

Big Shot

$190.00

Please do use the hostess code to support creativeJax if you are ordering online!  Entering the Hostess code combines the value of online orders – which assists me to offer events and thank you’s for my customers and support charities such as Ronald MacDonald House and local events where I donate product and/or classes.

The current Hostess Code can be found at the top right of my webpage.

If your order is over $300, please do not use this code as You become the hostess and get the Rewards!

If you would like to find out about joining my Stampin’ Up! Team (thINK Creative) –  Please do get in touch – I would love to chat to you about that.

You can receive my Blog Posts directly by email or join my monthly Newsletter group –  you can subscribe using the buttons at the right of my page. 


Permanent link to this article: https://creativejax.co.nz/2016/10/stampin-up-thailand-trip-nature/

CASEing the Catty – CTC101 – Favourite Bundle

Hello and welcome to this week’s CASEing the Catty Blog Hop featuring the crew’s favourite bundles from the Stampin’ Up! 2016-2017 Annual Catalogue.CASEing the Catty Blog - CTC101 - Fav Annual Catty Bundle

Whether you’re joining the Hop here, or if you’ve hopped on over from Liz at Lillybet’s Paper – or back from Simone at Stamp with Simone –  a BIG hello!

Remember to click on through this week’s CTC crew to see plenty of inspirational projects that the crew have created for you – there’s a full list on the CTC blog page  if you get lost along the way.

This week the crew gets to be inspired our favourite bundle in the Stampin’ Up! 2016-2017 Annual Catalogue – that’s a lot of options!

October is also Breast Cancer Action Month.  “Each year the New Zealand Breast Cancer Foundation (NZBCF) challenges you to TAKE ACTION to raise awareness amongst women and to raise funds for our breast cancer education, research and support programmes like free counselling and PINC Next Steps.”(http://nzbcf.org.nz)

October - Breast Cancer Month

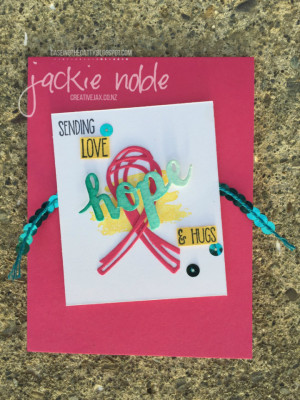
So I decided to make a card to raise awareness of Breast Cancer – it had to be pink of course!

2016_10_creativejax_ctc101_fav_bundle_sunshine_1

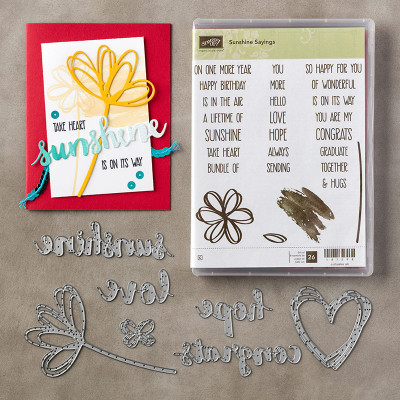
I’ve used one of my favourite bundles to create this card – Sunshine Sayings Stamp Set and Sunshine Wishes Thinlits – what a great Bundle!

142339g

I chose the wood bundle – with all those little sentiments I knew I would be using the stamp-a-ma-jig a lot for positioning. I find the wood mounted stamps easier to use with the stamp-a-ma-jig than the clear mounted stamps.

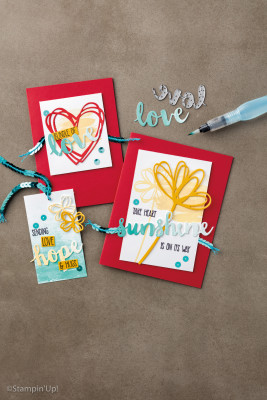
The image below is from page 97 of the annual catalogue and shows three projects made with the Sunshine bundle. I CASE’d all three in my card! I started with the card at the top left in mind – so the general layout and size of the card pieces comes from the top card. The sentiments come from the bottom left tag – so very appropriate for a Breast Cancer Awareness card, and I angled the white card just like in the bottom right card.

annual16_p097_a-270

Of course I needed to change the colours a little  – pink rather than red -so I chose Melon Mambo, Daffodil Delight and kept the Bermuda Bay.

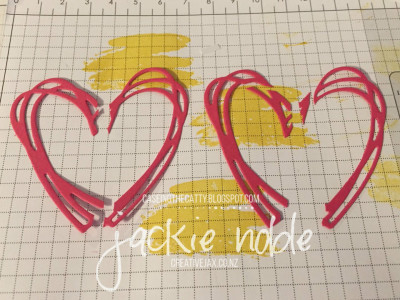
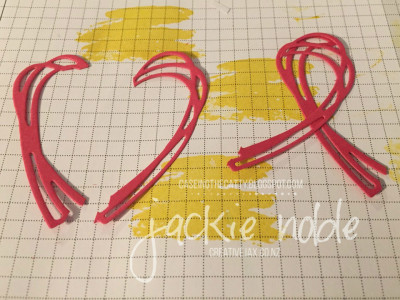
Rather than putting a heart on my card, I wanted a Pink Ribbon – and I used the heart die from the Sunshine Wishes Thinlits to make it. Here’s how!

Cut the heart in half and then trim the tops of each half as shown below.

2016_10_creativejax_ctc101_fav_bundle_sunshine_3

Here are the two halves – separate and overlapped the halves to form the ribbon!

2016_10_creativejax_ctc101_fav_bundle_sunshine_4

Here’s the front of the card again.

2016_10_creativejax_ctc101_fav_bundle_sunshine_1

The word “hope” is on watercolour paper which has been water-coloured in Bermuda Bay with an aqua painter before being cut out with the Thinlits.

The Bermuda Bay sequin trim is not only behind the white card, but also provides the “bling” on the card!

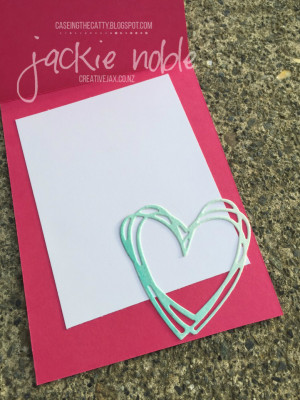
The heart on the inside is also cut from the watercolour paper which has been coloured with Bermuda Bay.

2016_10_creativejax_ctc101_fav_bundle_sunshine_2

Hope you enjoyed my project this week!

As always, CASEing the Catty is running a monthly challenge – so you can play along too!

We’d love you to share your own project that takes inspiration from one of the many Tags in the Stampin’ Up! 2016 Holiday catalogue. Just click on the Join Challenge Button below and you can add your project to the linky you will find at the bottom of the post.

October CTC Challenge

A winner will be chosen and announced on the first post of the following month.

Now depending on the direction you’re hopping–  hop on forward to the next blog – Simone  – or go back to the Previous Blog – Liz

Liz  Simone

And remember if you get lost along the way – head to the CTC Blog Home Page where you will see all those involved in this week’s CASEing the Catty Blog Hop and make sure you haven’t missed any of the great creations!

Thanks for stopping by and hope you enjoy all the other posts in the hop!

Logo 72ptUntil next time


Jackie

Stampin’ Up! Promotions

October DSP Special Buy 3 get 1 FREE!

I hope you enjoyed this post,

As always – if you wish to know anything more about  info in this post, or to get a catalogue, or to buy any of the items mentioned in the post, please contact me.

Or you can shop 24/7 at my online Stampin’ Up! shop – just click on the shop now button at the Top Right of the page.

Please do use the hostess code to support creativeJax if you are ordering online!  Entering the Hostess code combines the value of online orders – which assists me to offer events and thank you’s for my customers and support charities such as Ronald MacDonald House and local events where I donate product and/or classes.

The current Hostess Code can be found at the top right of my webpage.

If your order is over $300, please do not use this code as You become the hostess and get the Rewards!

If you would like to find out about joining my Stampin’ Up! Team (thINK Creative) –  Please do get in touch – I would love to chat to you about that.

You can receive my Blog Posts directly by email or join my monthly Newsletter group –  you can subscribe using the buttons at the right of my page. 


Product List

Big Shot

$190.00

Permanent link to this article: https://creativejax.co.nz/2016/10/stampin-up-ctc101-fav-bundle-sunshine/

Copper Embossed Merry Medley Luminary

Hi There!

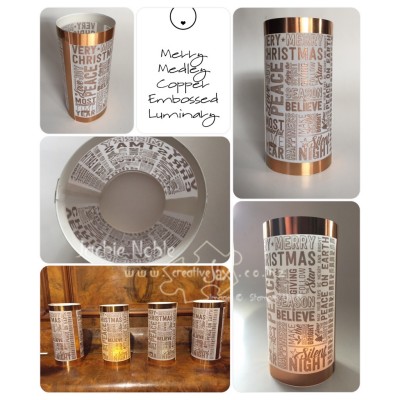
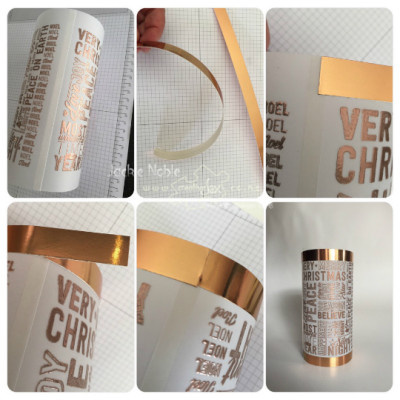
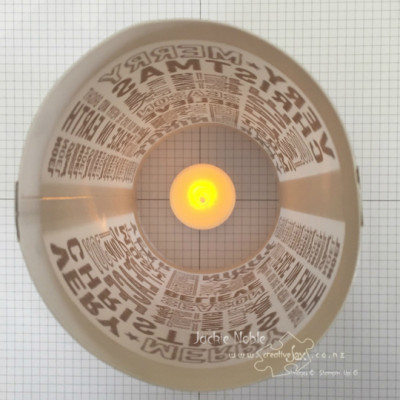
Today I’m sharing the instructions for a project I designed for my October “Stamp’ Up! Product Based Class” featuring the Merry Medley stamp – a copper embossed luminary made of vellum. Everyone attending the class purchased the stamp and came along to make 4 projects. I really enjoy running these classes based around a particular stamp set as everyone gets to make a range of items using their new product.

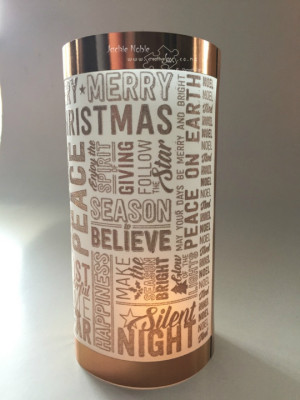
As soon as I saw the Merry Medley Stamp I knew I wanted to make a luminary using it. And what a perfect project to showcase Stampin’ Up!’s stunning Copper Embossing Powder and Copper Foil Sheets!creativejax_2016_10_merry_medley_copper_luminary_12

Before I give you the details of how to make the luminary – here’s the collage of the finished item that I shared on Facebook yesterday and which certainly generated such a lot of interest! Thanks so much for all the kind words and “Likes”. So pleased you all love it as much as I do!

Thanks so much for all the kind words and “Likes”. So pleased you all love it as much as I do!

creativejax_2016_10_merry_medley_copper_luminary_1

Stamps:
Merry Medley (rubber: wood mount 142148, clear mount 142152)
Ink:
Black Momento (132708) – or other dark ink – only used in construction – not the luminary itself
Paper:
Vellum  (106584)  – full sheet – will be trimmed during construction
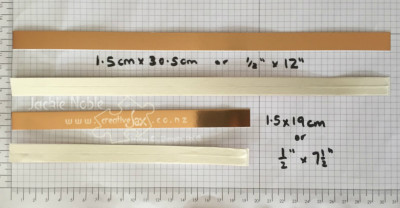
Copper Foil (142020) 2 pieces of 1.5cm x 19cm (~ 1/2″ x 7 1/2″), 2 pieces of 1.5cm x 30.5cm (~ 1/2″ x 12″)
Accessories:
Instructions:
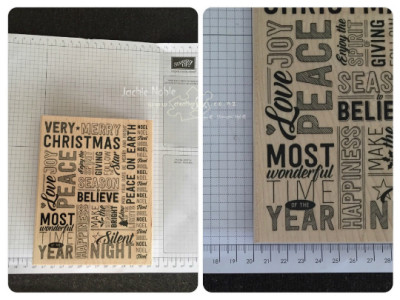
  1. Ink Stamp with a dark colour – e.g. Momento Black ink.
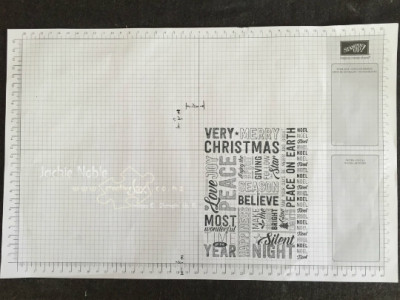
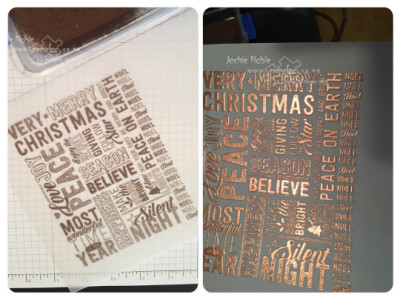
  2. Position stamp so that the left-hand edge and the bottom edge are running along the bold (dark) lines on the Grid paper. This image will be used as a guide for positioning the stamp when using Versamark. (below)creativejax_2016_10_merry_medley_copper_luminary_0
  3. Note: You could use a Stamp-a-ma-jig instead, but the stamp/block is very large and somewhat difficult to move easily. I found this method easier, especially in a class.
  4. Trim the vellum to 18cm (~ 7 1/2″) tall (when in Landscape) this will give approximately 2cm (~ 3/4″) above and below the final images on the luminary.
  5. There is also approximately 2cm (~ 3/4″) between the final embossed images.
  6. In relation to the edges of the black image, mark these measurements onto the Grid Paper. (below)creativejax_2016_10_merry_medley_copper_luminary_01
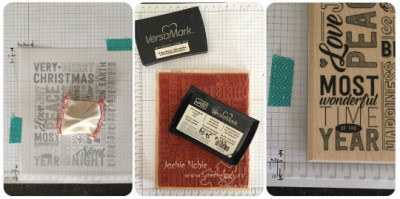
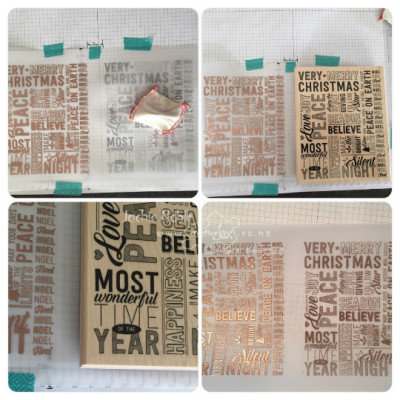
  7. Position the vellum over the black image – lining the outside edges to the marks on the grid paper. Tape the edges so the vellum paper doesn’t move. (below – left)
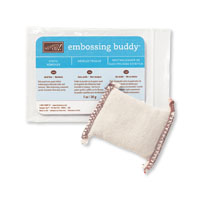
  8. Rub the Embossing Buddy over the vellum. (below – left)creativejax_2016_10_merry_medley_copper_luminary_2
  9. Ink the stamp using Versamark ink. With a large stamp like this one, it is easiest to place the stamp facing upwards and bring the ink pad to the stamp. (above – middle)
  10. Position the stamp against the same bold/dark lines as used previously and stamp your image. (above right)
  11. Remove stamp and spread Copper Embossing powder over vellum. Put plenty on, and then pour off any excess. I give the paper a quick flick on the back to remove any extra. (below – left)creativejax_2016_10_merry_medley_copper_luminary_3
  12. Turn on the heat tool and make sure it is warmed up before pointing it at the vellum. If the tool is well heated before you start, the powder will melt quickly and there will be less chance of scorching and warping the vellum.
  13. Pointing the heat tool away from your body and fingers, heat the powder until it melts. When using a Stampin’ Up! heat tool, I have the end of the tool approximately 1-2 inch from the paper surface and aim it so the hot air is running along the paper, away from me. I can then move the tool as the powder melts.
  14. Check all the powder is thoroughly melted. (above – right)
  15. Reposition the vellum onto the grid paper so that there is approximately 2cm between the embossed image and the image on the grid paper, and there is 2cm above and below. (below – top left)
  16. Re-ink the stamp with Versamark, line the block edges up to the bold/darks lines on the grid paper again, and stamp. (below – top right & bottom left)creativejax_2016_10_merry_medley_copper_luminary_4
  17. Cover the new Versamark image with embossing powder and heat emboss as described earlier. (above – bottom right)
  18. Place Tear Tape Adhesive on the back of the Copper Foil Strips.(below)creativejax_2016_10_merry_medley_copper_luminary_5
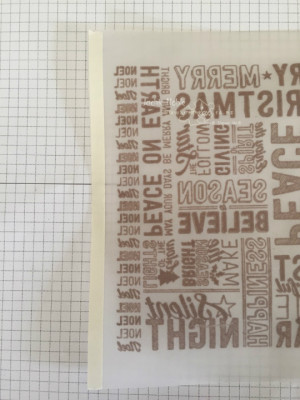
  19. Trim the vellum to 1.3cm (1/2″) past the outside edge of the embossed image on the left and right edges.
  20. Place Tear Tape Adhesive along one edge. (below)creativejax_2016_10_merry_medley_copper_luminary_6
  21. Join the right and left sides of the vellum. (below – top left)
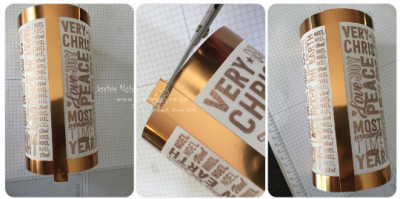
  22. Curl the longer pieces of copper foil using a bone folder. (below – top middle)
  23. Remove the adhesive backing and adhere the copper strip to the vellum – starting over the join and so that the top edges are aligned. (below – top right)
    creativejax_2016_10_merry_medley_copper_luminary_7
  24. Continue wrapping and adhering the copper foil strip to the vellum until it is completely encircled. There will be a little extra foil. Trim so that the edges butt up to each other but do not overlap – the join is too bulky if you overlap the edges. (above – bottom left and middle)
  25. Repeat at the other end of the luminary so that there is foil top and bottom. (above – bottom right)
  26. Remove backing from the tape on one of the shorter pieces of copper foil. Adhere to the vellum so that it covers the join. It will be slightly longer than the vellum. (below left)
  27. Trim off excess foil. (below middle)creativejax_2016_10_merry_medley_copper_luminary_8
  28. Remove adhesive backing from the last copper foil strip and adhere to the vellum between the two embossed images. (above – right)
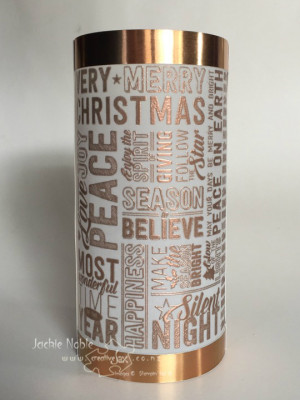
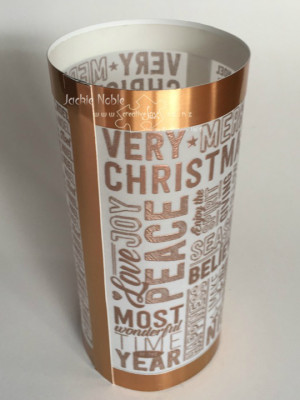
  29. The luminary is now finished!creativejax_2016_10_merry_medley_copper_luminary_10creativejax_2016_10_merry_medley_copper_luminary_9
  30. Place the luminary over a battery operated tealight candle

creativejax_2016_10_merry_medley_copper_luminary_11

creativejax_2016_10_merry_medley_copper_luminary_12


Thanks for stopping by and if you’d like to see another project featuring the copper embossing powder check out this CASEing the Catty Post using the Best Birds Stamp set.

Logo 72ptUntil next time


Jackie

Stampin’ Up! Promotions

October DSP Special Buy 3 get 1 FREE!


I hope you enjoyed this post,

As always – if you wish to know anything more about  info in this post, or to get a catalogue, or to buy any of the items mentioned in the post, please contact me.

Or you can shop 24/7 at my online Stampin’ Up! shop – just click on the shop now button at the Top Right of the page.

Please do use the hostess code to support creativeJax if you are ordering online!  Entering the Hostess code combines the value of online orders – which assists me to offer events and thank you’s for my customers and support charities such as Ronald MacDonald House and local events where I donate product and/or classes.

The current Hostess Code can be found at the top right of my webpage.

If your order is over $300, please do not use this code as You become the hostess and get the Rewards!

If you would like to find out about joining my Stampin’ Up! Team (thINK Creative) –  Please do get in touch – I would love to chat to you about that.

You can receive my Blog Posts directly by email or join my monthly Newsletter group –  you can subscribe using the buttons at the right of my page. 

Product List

Heat Tool

$60.00

Grid Paper

$23.50


Permanent link to this article: https://creativejax.co.nz/2016/10/stampin-up-copper-embossed-merry-medley-luminary/

CASEing the Catty – CTC99 – Holiday Tags meet Project Life

Hello and welcome to this week’s CASEing the Catty Blog Hop.CASEing the Catty Blog Hop CTC99 - Holiday Tags

Whether you’re joining the Hop here, or if you’ve hopped on over from Monique – or back from Judya BIG hello!

Remember to click on through this week’s CTC crew to see plenty of inspirational projects that the crew have created for you – there’s a full list on the CTC blog page  if you get lost along the way.

This week the crew gets to be inspired by our favourite tags in the Stampin’ Up! Holiday Catalogue – and there’s quite a few sprinkled throughout the catty!


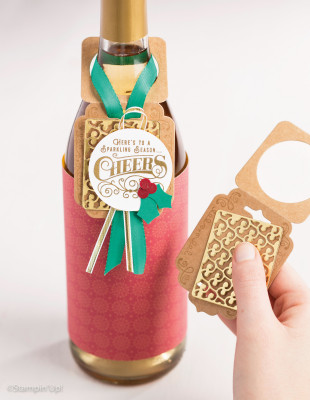
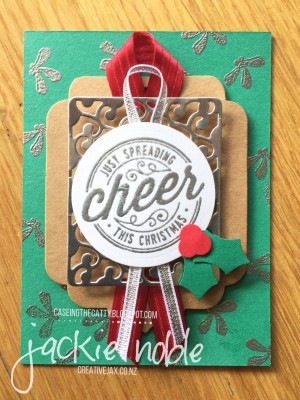
I’m particularly loving the Here’s to Cheers Stamp Set and the Cheerful Tags Framelit Dies and have chosen two of the tags made with these products to CASE this week.

holiday16_p38d-32 holiday16_p38c-31

Sharing food and drink with friends and family, and as gifts is a big part of the Festive Season in our household – and this Bundle is perfect for creating fabulous tags to put onto the gifts!

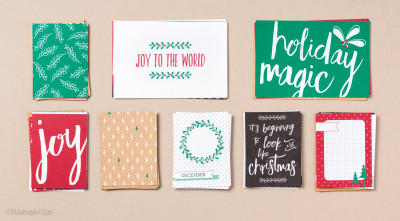
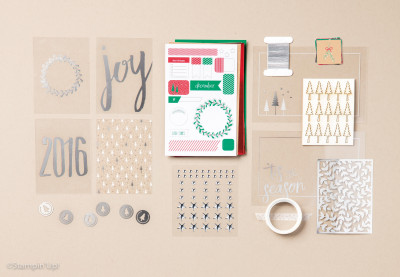
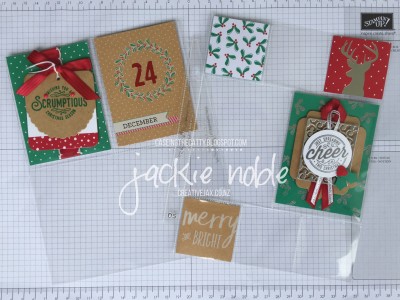
I know I’ll be using the set to make numerous gift tags in the upcoming months – but I’ve also started getting a December Daily photo album organised so that it is ready and just waiting for photos when December rolls around. And I’m sure I’ll have some photos of gift sharing and various celebrations to put into the album, so I’ve made a couple of pocket filler cards that match this year’s Hello December Project Life Card Collection and Accessory Pack which you can see below.

Hello December 2016 Card Collection

Hello December 2016 Card Collection

Hello December 2016 Accessory Pack

Hello December 2016 Accessory Pack

My first journal card used one of the 3″x4″ Project Life Cards as the base.

2016_10_creativejax_ctc99_tags_meet_projec_life_1

In my CASE, I’ve kept  the tag pretty much the same as the original – just changing some of the colours used. In keeping with the Hello December colour palette, I’ve used Whisper White and Kraft Cardstock, Emerald Envy Ink, White Baker’s Twine and several Real Red items – washi tape, Satin  Ribbon, Enamel Embellishments and the Stitched Edge Ribbon – Yay for coordinating products!


I made the base of my second filler card from Emerald Envy Cardstock and then embossed it with Silver – using one of the gorgeous wee stamps included in the Hello December Accessory Pack

2016_10_creativejax_ctc99_tags_meet_projec_life

Again the tag is very close to the original with just the colour palette adjusted to match the Hello December Suite. So goodbye gold & Cherry Cobbler and hello Silver & Real Red.

And here they are in the pages to go into my album waiting for the photos from the 24th of December …

2016_10_creativejax_ctc99_tags_meet_projec_life_2


I’m so looking forward to December when I can start filling my album with photos!

Hope you enjoyed my project this week!

As always, CASEing the Catty is running a monthly challenge – so you can play along too!

We’d love you to share your own project that takes inspiration from one of the many Tags in the Stampin’ Up! 2016 Holiday catalogue. Just click on the Join Challenge Button below and you can add your project to the linky you will find at the bottom of the post.

October CTC Challenge

A winner will be chosen and announced on the first post of the following month.


Now depending on the direction you’re hopping–  hop on forward to the next blog – Judy  – or go back to the Previous Blog – Monique

Monique  Judy

And remember if you get lost along the way – head to the CTC Blog Home Page where you will see all those involved in this week’s CASEing the Catty Blog Hop and make sure you haven’t missed any of the great creations!

Thanks for stopping by and hope you enjoy all the other posts in the hop!

Logo 72ptUntil next time


Jackie

Stampin’ Up! Promotions

October DSP Special Buy 3 get 1 FREE!


I hope you enjoyed this post,

As always – if you wish to know anything more about  info in this post, or to get a catalogue, or to buy any of the items mentioned in the post, please contact me.

Or you can shop 24/7 at my online Stampin’ Up! shop – just click on the shop now button at the Top Right of the page.

Please do use the hostess code to support creativeJax if you are ordering online!  Entering the Hostess code combines the value of online orders – which assists me to offer events and thank you’s for my customers and support charities such as Ronald MacDonald House and local events where I donate product and/or classes.

The current Hostess Code can be found at the top right of my webpage.

If your order is over $300, please do not use this code as You become the hostess and get the Rewards!

If you would like to find out about joining my Stampin’ Up! Team (thINK Creative) –  Please do get in touch – I would love to chat to you about that.

You can receive my Blog Posts directly by email or join my monthly Newsletter group –  you can subscribe using the buttons at the right of my page. 


Product List

Heat Tool

$60.00


Permanent link to this article: https://creativejax.co.nz/2016/10/stampin-up-ctc99-tags-project-life/

CASEing the Catty Blog Hop – CTC98 – Warmth and Cheer

Hello and welcome to this week’s CASEing the Catty Blog Hop.CASEing the Catty Blog Hop CTC98 - Warmth and Cheer

Whether you’re joining the Hop here, or if you’ve hopped on over from Kelly – or back from Moniquea BIG hello!

Remember to click on through this week’s CTC crew to see plenty of inspirational projects that the crew have created for you – there’s a full list on the CTC blog page  if you get lost along the way.

This week the crew gets to be inspired by the Warm and Cheer Section of the Stampin’ Up! Holiday Catalogue – pages 12 – 19.

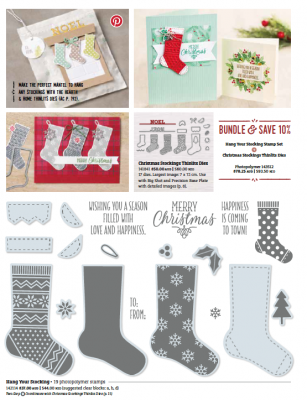
This week in choosing a set to use, I looked at any of the stamp sets in this section which I have and which have not yet seen ink. I have Hang Your Stocking and the matching Christmas Stocking Thinlits Framelits and have wanted to get them out of their packets. You’ll find the bundle and the inspiration for my CASE on page 15.

2016_10_creativejax_ctc98_hang_your_stocking

We have family Christmas Stockings which we hang every year – a tradition stated more than 25 years ago when we lived in Regina Canada. We spent both our Canadian Christmas’ with our adopted Canadian Family – the Heinrich’s in Davidson, Saskatchewan – and we were honoured to have them make and gift us own stockings the first Christmas we shared with them. After our children were born I made them their own to hang with ours each year.

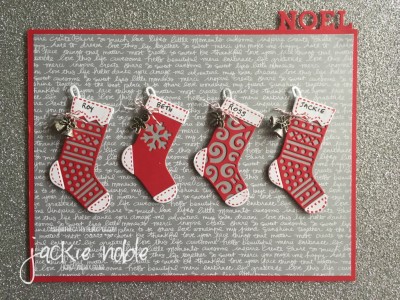
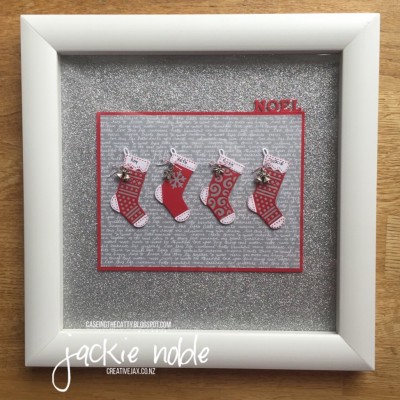
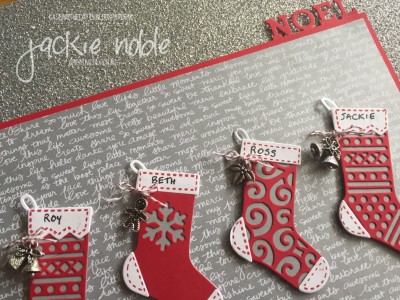
So I decided to CASE that cute card with the 3 stockings – but have 4! Each of the Stockings is named – just like our real ones are!

2016_10_creativejax_ctc98_hang_your_stocking_2

But rather than making a card – I made a Home Decor item that I could keep and use every year!

2016_10_creativejax_ctc98_hang_your_stocking_6

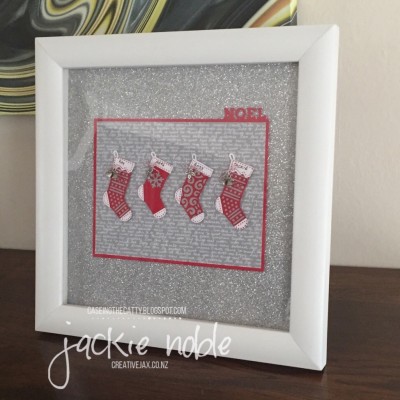
The stockings are adhered to one of the patterns from the Neutral Stacks of DSP (Designer Series Paper) – silver and with a soft script. There are so many wonderful words on this DSP – I love it! The DSP is matted onto a piece of Real Red which is then popped up with dimensionals onto a 12×12 sheet of Silver Glimmer Paper – it just sparkles in real life! The page is then displayed in  deep 12×12 frame.

While the 3-stocking card was the main inspiration for my CASE, I did add elements from the other two cards as well.

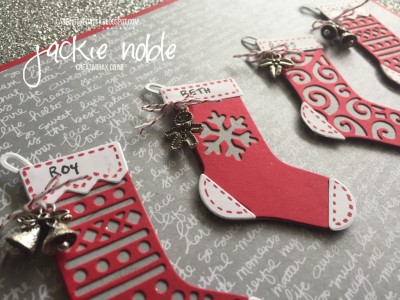
Rather than stamping the stockings as is done in the original card – I’ve used the Framelits like the centre card at the top of the page. Like that card – I also tied one of the gorgeous wee Christmas Trinkets Embellishments on each stocking. Though I’ve stayed with the Real Red, Smokey Slate and Whisper White colour palette.

2016_10_creativejax_ctc98_hang_your_stocking_3

I loved the look of the sentiment above the fireplace in the top left-hand card …

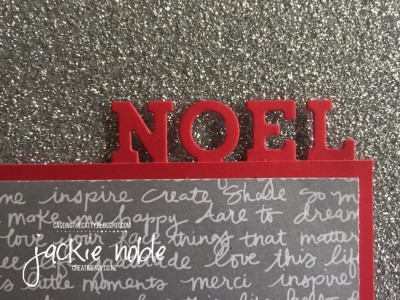
2016_10_creativejax_ctc98_hang_your_stocking_7The Noel die is just too cute! So easy to add the word perfectly spaced and positioned evenly!

Here’s another close up.

2016_10_creativejax_ctc98_hang_your_stocking_4One of the other things I was struck by when I was taking some photos for my post was the stunning Bokeh effects that the Silver Glitter sheets give – here’s what I mean.

2016_10_creativejax_ctc98_bokeh1 2016_10_creativejax_ctc98_bokeh

So I put my frame on the sideboard today – it’s not too early for Christmas decorations is it ?!?!

2016_10_creativejax_ctc98_hang_your_stocking_5

Hope you enjoyed my project this week!

As always, CASEing the Catty is running a monthly challenge – so you can play along too!

We’d love you to share your own project that takes inspiration from pages 66 to 99 of the Stampin’ Up! 2016 catalogue. Just click on the Join Challenge Button below and you can add your project at the linky you will find at the bottom of the post.

October CTC Challenge

A winner will be chosen and announced on the first post of the following month.

Now depending on the direction you’re hopping–  hop on forward to the next blog Monique – or go back to the Previous Blog Kelly

Kelly  Monique

And remember if you get lost along the way – head to the CTC Blog Home Page where you will see all those involved in this week’s CASEing the Catty Blog Hop and make sure you haven’t missed any of the great creations!

Thanks for stopping by and hope you enjoy all the other posts in the hop!

Logo 72ptUntil next time


Jackie


Stampin’ Up! Promotions

October DSP Special Buy 3 get 1 FREE!

WCMD Specials


I hope you enjoyed this post,

As always – if you wish to know anything more about  info in this post, or to get a catalogue, or to buy any of the items mentioned in the post, please contact me.

Or you can shop 24/7 at my online Stampin’ Up! shop – just click on the shop now button at the Top Right of the page.

Please do use the hostess code to support creativeJax if you are ordering online!  Entering the Hostess code combines the value of online orders – which assists me to offer events and thank you’s for my customers and support charities such as Ronald MacDonald House and local events where I donate product and/or classes.

The current Hostess Code can be found at the top right of my webpage.

If your order is over $300, please do not use this code as You become the hostess and get the Rewards!

If you would like to find out about joining my Stampin’ Up! Team (thINK Creative) –  Please do get in touch – I would love to chat to you about that.

You can receive my Blog Posts directly by email or join my monthly Newsletter group –  you can subscribe using the buttons at the right of my page. 

Product List

Big Shot

$190.00

Permanent link to this article: https://creativejax.co.nz/2016/10/stampin-up-ctc98-warmth-and-cheer/