Christmas Ornaments

Hi Again

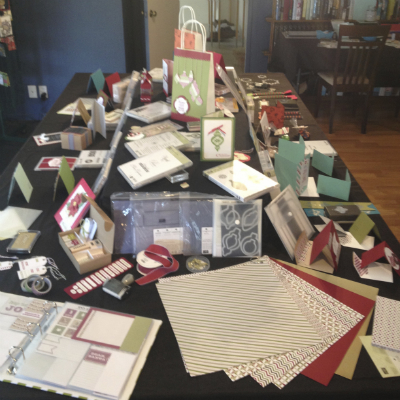
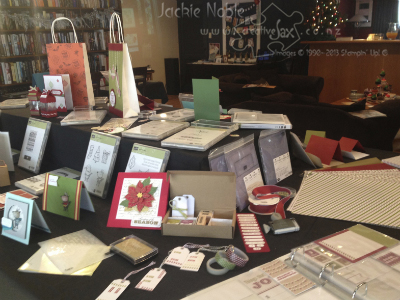
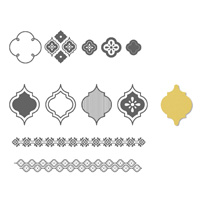
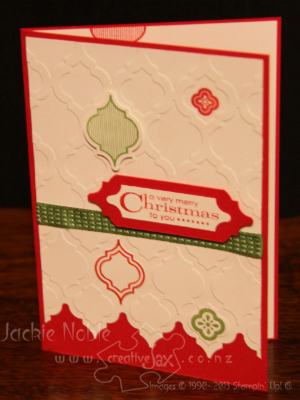
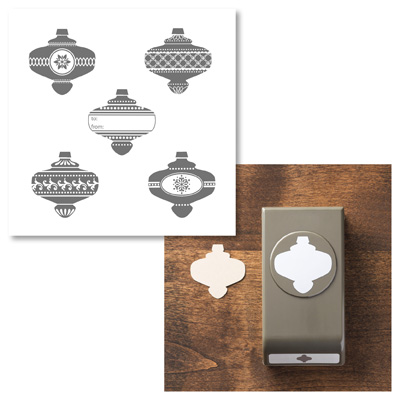
The first selection of cards from the Open House that I want to share with you are these 3 cute little gift tags featuring the Christmas Ornament Punch and the Christmas Collectibles Stamp Set. (See below for details of these products which are available as a bundle.)

2013_09_29_Display_CloseUp_ornament_Envelope_Liners_resized

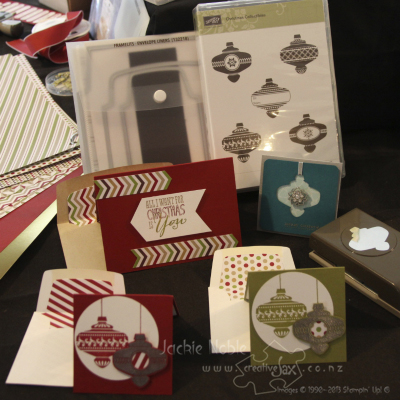
The little gift tags are made to fit the 7.9 x 7.9cm Square Envelopes. The larger card in the photo is sized to fit our Crumb Cake 13 x 9.2cm Note Card Envelopes.

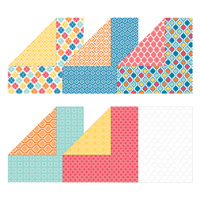
All the envelopes shown have liners made with the gorgeous Season of Style DSP using the Envelope Liners Framelits Dies.

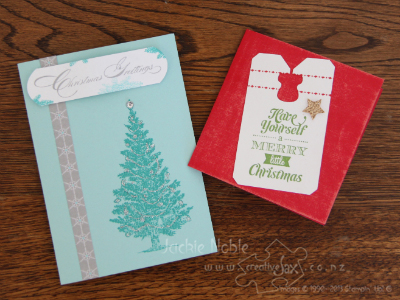
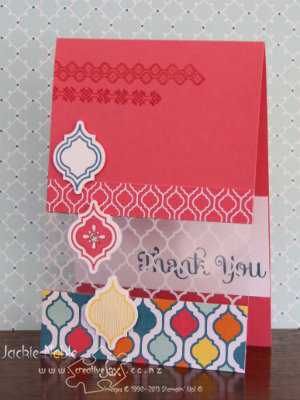
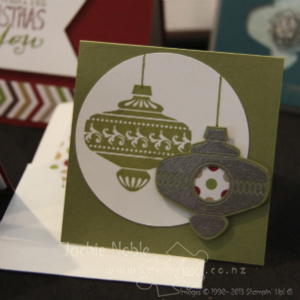
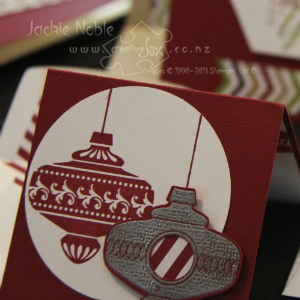
The Old Olive and Cherry Cobbler cards show how changing the colour scheme can change the look of a card.

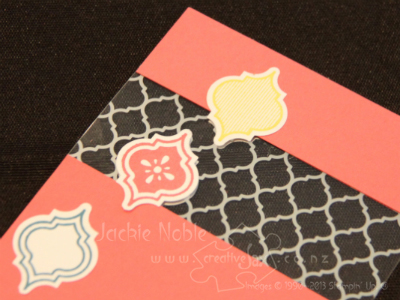
One of the many things I love about Stampin’ Up! is how products co-ordinate. Isn’t it great that the middle of one of the Christmas Collectibles stamps can be perfectly punched out using the 1.3cm circle punch and filled with the Season of Style DSP?

2013_09_29_Ornament_OldOlive_resized2013_09_29_Ornament_CherryCobbler_resized

___________________________________
 
Ink: Old Olive (126953) or Cherry Cobbler (126966),  VersaMark (102283)
Stamps: Christmas Collectables (Wood 131772, Clear Mount 131775)
Card/Paper: Old Olive (106576) or Cherry Cobbler (121681), Whisper White (106549) ,
Season of Style DSP (132340)  Accessories: Silver Embossin’ Powder (109131), Dimensionals (104430),
Stampin’ Write Markers – Old Olive (131259) or Cherry Cobbler (131262)
Tools: Heat Tool (129056), Christmas Ornament Punch (132152), 6.4cm Circle Punch (120906), 1.3cm Circle Punch (119869), Big Shot (113439), Envelope Liners Framelits (132218) 
___________________________________
 

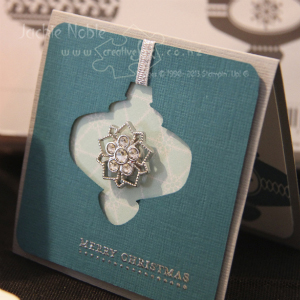
The Island Indigo card uses the negative space made by the Christmas Ornament Punch – and that space was just waiting to be filled with the utterly adorable Frosted Finishes Embellishments!

2013_09_29_Ornament_IslandIndigo_resized______________________
 
Ink: VersaMark (102283), Island Indigo (126986) 
Stamps: Teeny Tiny Sentiments (Wood 130042, Clear Mount 120024) Card/Paper: Textured 12″ x 12″ Cardstock – Island Indigo (132132) and Smoky Slate (132131), Whisper White (106549), Winter Frost Specialty  DSP (132341)  Accessories: Silver Embossin’ Powder (109131), Dimensionals (104430), Silver 3.2mm Ribbon (132137), Frosted Finishes Embellishments (132150) Tools: Heat Tool (129056),  Christmas Ornament Punch (132152)
______________________
 
BUNDLE AND SAVE!

Christmas Ornament Bundle 133282L

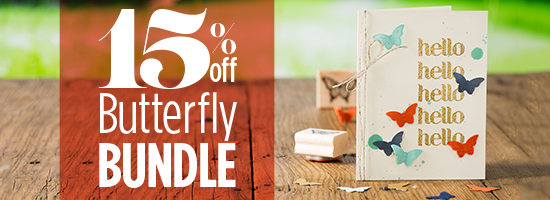
The Christmas Ornament Punch and Christmas Collectibles Stamp Set are available in a bundle. The wood mounted stamp bundle is $67.95 and the clear mounted stamp bundle is $60.25 That’s a 15% saving. You can

There are several great bundles available for products from the Holiday Catalogue – you can check them all out HERE

Logo 72pt

Until next time

Jackie


Permanent link to this article: https://creativejax.co.nz/2013/10/christmas-ornaments/

World Card Making Day and Around the World Stampin’ Up! Challenges

Hi There

Did you know that October 5th was World Card Making Day. What a great excuse to make some cards – though who needs an excuse!

I was going to make some thank you cards anyway and making cards for others seemed a great thing to do to celebrate the day.

These are some of the cards I made.

2013_10_5_AW02

The colours in the cards are Always Artichoke, Pear Pizzazz, Mambo Melon and Daffodil Delight.

I chose these colours as they are from the latest challenge of a blog that I follow – Around the World Stampin’ Up! Challenges.

AW-02

Check out the blog  HERE I have submitted these cards into the challenge – the first time doing a challenge for me.

The design team for the site are some very talented demonstrators from around the world – including my upline Kristine. You can check her website at Creative Stamping

Until next timeLogo 72pt

Jackie

Permanent link to this article: https://creativejax.co.nz/2013/10/aw02/

Christmas Open House

I  LOVE Christmas!!!

On Sunday (29 September) Beth and I had the absolute pleasure of sharing some of the fantastic products from the Stampin’ Up! Holiday Catalogue at my Christmas Open Home. (You can view the Holiday Catalogue online as a flip-book HERE)

I am very fortunate that we have a large games room downstairs in which I hold my classes and events like the Open House. The games room has a pool table on one side and a media area on the other. Roy made a cover that goes onto the pool table which converts it to a large table that can be used for all sorts of things. The media area is perfect for me to run my classes in. You can see my class set-up HERE. I can also contact my laptop to it and project whatever is on the computer up onto the large screen – great for MDS!

It was such fun making things to display. Of course I had to make sure that each product item that I have from the new Holiday Catalogue was used in at least one sample – some got multiple uses!

The main display was on our trusty pool table – so handy for me to showcase samples and products.

2013_09_29_Main_Display_resized

Around the lower level I displayed products I have from the new catalogue and samples I’ve made using them. On the raised level I had products in the carryover list and samples made with those products.You can view the Autumn Winter Carryover List HERE

The two images taken from each end of the table are a bit blurry but give you an idea of what was on display.

2013_09_29_Main_Display_PianoEnd_resized

2013_09_29_Main_Display_doorend_resized

I had several other stations set up around the room. Below shows the Make & Take table in the fore-ground and my “Inspire Create Share” display-frame hanging above the sign-up/MDS/banner table.

2013_09_29_MakenTakes_resized

These were the two Make & Takes available for a gold coin donation. All donations were for Stampin’ Up!’s official charity – Ronald McDonald House Charities. CLick HERE for more information about the Making a Difference partnership Stampin’ Up! has with Ronald McDonald House Charities, including the donation of NZ$3.50 for every “Tag It” stamp set sold.

2013_09_29_Make_n_Takes_resized

__________________________
 
Stamps: Merry Little Christmas (Wood 131826, Clear-mount 131829)
Ink: Gumball Green (126861), Real Red (126949) Paper: Real Red  – Brights Core’dinations (129953), Whisper White (106549) Accessories: Champagne Glitter Paper (127885), Stampin’ Dimensionals (104430)
Tools: Big Shot (113439), Chalk Talk Framelits (129983)
 
Stamps: Special Season (Wood 131766, Clearmount 131769) Ink: Bermuda Bay (131171) Smoky Slate (131179) 
Paper: Pool Party (124391) Whisper White (106549), Winter Frost Specialty DSP (132341)
Accessories: Silver Sparkle Dazzling Details (127845), Rhinestone Basic Jewels (119246),
Stampin’ Dimensionals (104430) Tools: Extra-Large Oval (119859)
_________________________

We dug out the little Christmas Tree and Beth had a great time decorating it.

2013_09_29_Signup_XmasTree_resized

The photo below gives you an idea of the layout of the room. You can just see the digital display on the wall (round from my frame).

2013_09_29_Display_MDS_on_Screen_resized

Even though the focus was on the new catalogue, I did display some core product from the Annual Catalogue (stamp pads, DSP, Stampin’ Markers and embellishments).

2013_09_29_Annual_Catalogue_Products_resized

While guests were relaxing with a juice or cup of tea/coffee and checking out catalogues they also got to enjoy cupcakes – made by Beth as always.

2013_09_29_Cupcakes_resized

A close-up of the Holiday themed cupcakes.2013_09_29_Cupcakes2_resized

And I just had to share this photo – it features our two cats – Molson and Carina – who often keep me company.

2013_09_29_Display_and_cats_resized

Carina is Beth’s 8 month old grey kitten – named after a star constellation. Molson is our 16-year-old ginger family cat – named after one of Roy’s favoured beers from our time living in Canada many years ago.

I hope you’ve enjoyed this overview of our day.

Thanks to those who called in during the day and for participating in the Make & Takes.

Over the next week I will post some close-ups and details of the samples I made.

If you have any questions, or would like to order any of the products shown, please contact me at jackie@creativejax.co.nz or 027 348 3901.

Until next time.


Jackie


Permanent link to this article: https://creativejax.co.nz/2013/10/christmas-open-house/

Minions everywhere!

Had to share these photos.

Even though our children are well passed the age of cartoons – Roy and I still eagerly headed off to the Despicable Me 2 movie.

I just love the minions and had to try my hand at a card.

There are HEAPS of Minion cards out there that I chuckled over and drew inspiration from to come up my card.

2013_Sept_minionCard

2013_Sept_minion_card_closeup

This was quite a fiddly card to put together – especially the hair! But so worth it!

And then Beth did a Minion Cake decorating class last weekend – soooooo cool don’t you think!

2013_many_minions

 The Minion even has his own cake – a gorgeous layered creamed sponge cake!

2013_Sept_Minion_cake

And not only did he look fantastic – he was very tasty too!  Though very hard to cut.

My Super Six Stampers got to enjoy a piece on Monday.

2013_Sept_eaten minion_cake

He’s looking a bit worried about now!

Until next timeLogo 72pt

Jackie

Permanent link to this article: https://creativejax.co.nz/2013/09/minions-everywhere/

September Class (Part 2) Butterfly Bundle

As promised – here at last are the details of the second card made at my September Classes.

This black and “vanilla” coloured card uses the Papillon Potpourri Stamp Set and the Bitty Butterfly punch which are currently available as a bundle (see details below). The only ink colour used on the card is basic black. The colouring of the Naturals Ivory paper works beautifully for the look I wanted to achieve. Using a doilie as a mask, I sponged some Basic Black into the card and with the doilie still acting as a mask, I stamped the two larger butterflies. This technique is great for giving the impression of depth to the card.

2013_sept_class_butterfly_bundle-copy

__________________________________________

 Ink: Basic Black (126980) Stamps: Papillon Potpourri (Wood 132058, Clear Mount 123759),
Label Love (Wood 130619, Clear Mount 130622) Card/Paper: Basic Black (121688), Naturals Ivory (108630) , Modern Medley DSP (126926) Accessories: Crochet Trim Victoria (118481),  Dimensionals (104430),
Pearl Basic Jewels (119247),Glue Dots (103683), Tools: Bitty Butterfly Punch (131267), Artisan punch (130920) Stamping Sponges (101610), Tea Lace Paper Doilies (129399)
_________________________________________
 

As Punches were one of the focus for my September classes, I wanted to show some different ways the punch could be used. We have used both positive and negative punched shapes on the card. By punching out the front Very Vanilla card-stock the negative acts as a window through to the Basic Black below. The positive butterflies are both stamped (on Naturals Ivory) and unstamped (Basic Black) and have been attached using glue dots. Those Basic Pearl Jewels give an elegant look to the card in keeping with the Crochet Trim

I have also used the Artisan Label for the sentiment and its mat. This label shape lends itself to being used as a matted sentiment embellishment – so easy to cut the mat (in this case black) in half and have a little showing at the top and the bottom. Alternatively you can also simply off-set the two labels a little for a different look.


creativeJax - Masking using doillies. Papillon Potpourri, Label Love. Bitty Butterfly punch. Close-up of embellishment


I always look forward to new DSP and the selection in this year’s Annual Catalogue is awesome – something for every occassion.  I am loving the classic colour combination of Basic Black and Very Vanilla in the Modern Medley papers. And there is a dictionary pattern – doesn’t get much better than that!

Other Cards

Just as I had done with the Mosaic Aperture card, I had made a few other cards using the Papillon Potpourri stamp set to share with the class.

Keeping with the colours used in my class card, I had made a square card featuring several of the co-ordinating butterfly products. The Elegant Butterfly punch also co-ordinates with some of the stamps in the Papillon Potpourri Stamp Set.

2013_09_09_Butterfly_square_BlacknVanilla copy

_____________________________
 
Ink: Basic Black (126980) Stamps: Papillon Potpourri (Wood 132058, Clear Mount 123759), 
Express Yourself (Hostess) Card/Paper: Basic Black (121688), Very Vanilla (106550) ,
Accessories: Dimensionals (104430), Pearl Basic Jewels (119247), Glue Dots (103683) Tools: Bitty Butterfly Punch (131267), Elegant Butterfly Punch (127526) Stamping Sponges (101610), Beautiful Wings Embosslits (118138)
 _____________________________

First I stamped and punch out the small and large floral patterned butterflies. I wanted to use the negative spaces left behind on the card so punched them out using the and  circle punches. Before laying out my card front though, I used the Elegant butterfly as a stencil and then used a piece of cut up sponge to create the butterfly shape on the inside of my card – you can just see it peeping out below. By only sponging lightly the textured look of the sponge is in the butterfly shape.

2013_09_09_Butterfly_square_closeup copy

I love how the Bitty Butterfly punched shape fits inside the negative created by the Elegant Butterfly punch. And then there are more butterflies – the Beautiful Wings Embosslits Die certainly lives up to its name! So cool layered AND they fit beautifully inside the Bitty Butterfly punch. The way products co-ordinate is just one of the many things I love about Stampin Up! – yay!

The second card I shared with the class was to show the butterflies in a more colourful light. Using all of the colours in the Brights card-stock

2013_Butterfly_Brights

 ________________________

 
Ink: Basic Black Classic Ink Pad (126980), Brights Stampin’ Write Markers (131259) 
Stamps: Papillon Potpourri (Wood 132058, Clear Mount 123759), Chalk Talk (Wood 130631, Clear Mount 130634) Card/Paper: Brights Cardstock (131282), Whisper White (106549) 
Tools: Bitty Butterfly Punch (131267), Big Shot (113439), Chalk Talk Framelits (129983), Stamping Sponges (101610) Accessories: Daffodil Delight 1/4″ Stitched Grosgrain (126872), Glue Dots (103683)

________________________


This was a fun card to make. See the layered butterflies in the close-up? There are three of each colour – two on the outside of the card and one on the inside.

2013_ButterflyBrights_closeup


Finally – Just a reminder that the Butterfly Bundle promotion finishes on 30 September. This is a fantastic opportunity to purchase the versatile Papillon Potpourri Stamp Set and Bitty Butterfly Punch at a great price – with 15% off.

2013_08_29_Header_ButterflyBundle Offer: Get 15 percent off when you buy this bundled butterfly stamp set and punch!

Bundle Item Page in Catalogue Description Retail Price 15% Savings Price Amount Saved!
135311 90
183
Butterfly Bundle (Clear-Mount)
Papillion Potpourri Clear-Mount Stamp Set
Bitty Butterfly Punch
$65.90 $56.02 $9.88
135312 90
183
Butterfly Bundle (Wood-Mount) 
Papillion Potpourri Wood-Mount Stamp Set
Bitty Butterfly Punch
$73.90 $62.82 $11.08

If you would like to order the bundle please contact me by email or phone 027 348 3901.

Or if you wish to order online, you can do so at my online shop 24/7.

Logo 72pt

Until next time

Jackie


Permanent link to this article: https://creativejax.co.nz/2013/09/september-class-part-2-butterfly-bundle/

September Class (Part 1) Mosaic Madness

Earlier in the week I had the pleasure of introducing a group of my friends to Stampin’ Up! and card-making. I call them my “Super Six” group – though with a visitor from the UK joining us so it was the “Super Seven”!

At our gathering we made one of the two cards I am doing at my September Classes.  It was really awesome to be able to share something I love so much with this group of cool women. They’ll be coming back to do the other class card in couple of weeks. One card was enough for a first-time introduction to stamping and card-making!

When Beth and I were back in Hamilton recently we had the opportunity to attend class with my fantastic up-line Kristine McNickle. The first class card – and the one my “Super Seven” made – was CASED from Kristine.


2013_Sept_Class_Aperture_Mosaic_Madness copy

 _________________________________
 
Ink: Daffodil Delight (126944), Island Indigo (126986), Strawberry Slush (131178)
Stamps: Mosaic Madness (Wood 130246, Clear Mount 130249), Four You  (Wood 130535, Clear Mount 130538), 
Card/Paper: Strawberry Slush (131300), Whisper White (106549) , Quatrafancy Specialty DSP (130141)    
Accessories: Rhinestone Basic Jewels (119246), Dimensionals (104430)     Tools: Mosaic Punch (131267)
___________________________________
 

The card features several of the products in the Quatrafancy suite. The specialty window sheet in the Quatrafancy Specialty DSP (Designer Series Paper) has a cool Whisper White quatrefoil print on it which is perfect for this aperture card.

Quatrafancy_DSP_130141

The paper co-ordinates with the Mosaic Madness Stamp Set (wood or clear) and the Mosaic Punch. This stamp set and punch is also available as a bundle – with a 15% savings on purchasing them separately.

Mosaic_bundle_132734w

Mosaic Wood Mount Bundle (132734) – $77.25

Mosaic Clear Mount Bundle (132733) – $67.92

The group enjoyed using the matching stamps and punch – much easier than cutting each mosaic out!

2013_Sept_Mosaic_Madness_inside copy

On the inside of the card we strategically placed punched mosaics so that the dimensionals were not visible through the window sheet.

Before each class, I usually make another card – or two – or three – to illustrate the versatility of the stamp set used in my card classes. This hopefully provides some other creative ideas for class attendees.

For the Mosaic Madness stamp set I had made two other cards to share with the group. In the first additional card, I used stamps from the Mosaic Madness Stamp Set which we hadn’t used in our class card, producing a very different card.

2013_09_09_Mosaic_Madness_3strips_circlepunch copy

____________________________________
 
Ink: So Saffron (126957), Primrose Petals (126858), Garden Green (126973)
Stamps: Mosaic Madness (Wood 130246, Clear Mount 130249),  
A Dozen Thoughts (Wood 131056, Clear Mount 131059), 
Card/Paper: So Saffron (108611), Primrose Petals (127544), Garden Green (108605), Whisper White (106549),
Basic Black (121688)
Accessories: Candy Dots – Subtles (130933), Dimensionals (104430)     
Tools: Itty Bitty Shapes Punch Pack (118309) 1 1/4″ CIrcle Punch (119861)
___________________________________

As can be seen in this close up – dimensionals always give things a lift!

2013_09_09_Mosaic_Madness_3strips_circlepunch_closeup copy

I got this colour combination from my trusty “Color Coach” – a fantastic tool for help with colour selection. Not only does the Color Coach include a swatch of each of the colours in Stampin’ Up!’s colour colections, but on the back of each card are suggestions for colour combinations. There are even some blank cards for recording your own favourite combinations.

Color_Coach130118S

Color Coach – (130118) – $31.95 

Another item in the Quatrafancy Product Suite is the Mosaic Embossing folder. This co-ordinates beautifully with both the Mosaic Madness stamp set and the Mosaic punch.

Mosaic Embossing_Floder_129984

Modern Mosaic Textured Impressions Embossing Folder (129984) — $16.95

As you can see from this card – the mosaic shape lends itself to Christmas too!

2013_Sept_Mosaic_Christmas copy

___________________________________
 
Ink: Real Red (126944), Gumball Green (126986)  
Stamps: Mosaic Madness (Wood 130246, Clear Mount 130249), 
More Merry Messages (Wood 126400, Clear Mount 126402), 
Card/Paper: Real Red (131300), Whisper White (106549) , Gumball Green (130141)    
Accessories: Gumball Green 1cm Stitched Satin Ribbon (126848)  Dimensionals (104430)     
Tools: Mosaic Punch (131267)
___________________________________
 

Now for a helpful hint. You can do so much more with a punch than just punch out the intended shape. I got the idea for making labels with the mosaic punch after seeing a tutorial by Kim Skinner on YouTube the described how to extend the length of punches. By using strips of cardstock of different widths I got labels of differing dimensions which were ideal for layering.

Call back in a couple of days to see the other card I designed to make in this month’s class – using the Butterfly Bundle.

Until next timeLogo 72pt

Jackie

Permanent link to this article: https://creativejax.co.nz/2013/09/september-class-part-1-mosaic-madness/

Wellington Paper Arts and Craft Show

What a weekend!

WgtnPaper Show


Beth and I had a wonderful – and busy – weekend at the Wellington Paper Arts and Craft Show on Saturday and Sunday.

The Te Rauparaha Arena in Proriua provided a great venue.

We meet many wonderful people and enjoyed sharing our love of Stampin’ Up! products.


Here we are just before the doors opened. Beth took care of Make & Takes on both days and was flat out for the whole weekend.
2013_08_25_Jax_n_Beth_WgtnPaperShow


Visitors to the stall could see a range of cards (some of you fellow demos may recognise your convention swap below!), MDS, samples of cardstock, embossing folders, pressed clay, ribbons and DSP. I also had cards with retired products and retired stamp sets for sale.

2013_08_25_WgtnCraftShowDisplay


My Inspire Create Share frame showcased samples made with products from the about-to-be-released Holiday Catalogue. There was a lot of interest in the samples – and in the frame!

2013_08_25_jaxBeth


Congratulations to our door prize winner – a teenage crafter who was at the show with her Mum and Grandmother. Three generations who make cards together – awesome!

We were pretty exhausted by Sunday evening and I have spent the last couple of days putting my craft room back in order so that I can actually make something.

It was great to be in such a craft-loving environment for the weekend and it was a pleasure to meet and talk with such a wonderful range of people. We loved giving people the opportunity to see and touch a range of Stampin’ Up! products and hope to see many of you again.

Logo 72pt

Until next time

Jackie


Permanent link to this article: https://creativejax.co.nz/2013/08/wellington-paper-arts-and-craft-show/

Inspire Create Share Frame

Have you noticed my new profile picture – I’ve been framed!

I just love the frame on the front of our current annual catalogue and thought if only I had one like it that I could use to display cards … Luckily I have access to an amazing handyman – my hubby Roy. With a little “persuasion” he took to the task with his usual attention to detail and voila … an awesome frame!

Before using it as a display piece, I thought it would be cool to take a few pictures with the intention of updating my profile picture. So I asked Ross, our 18 year son, to be photographer for the “photo-shoot”!  Again with just a little persuasion, Ross obliged and we had a fun time trying out some options. Below are a few of the images that didn’t make the cut!

We started outside. While the backdrop of the inlet was pretty – the wind was a bit of a problem! Tassels everywhere and banners moving too quickly to be captured. The wind swept tassels were made from the rectangular sheets of Creped Filter Paper which had been coloured by spritzing. I put a few drops of Pool Party Ink Refill into a Stampin’ Spritzer along with some water and spritzed the sheets before cutting them into strips.

2103_08_24_JaxinFrame_WindyInlet

The large flower was made from the circle sheets of creped filter paper which I cut out using the Floral Frames Collection Framelits. As I wanted a rich colour on these, I used the Brayer and Strawberry Slush Ink Pad to build up colour onto the filter paper. The bottom ones are darker than the top. The little yellow flowers are also from the rectangular crepe filter paper, brayer with Daffodil Delight and cut into strips.

So we moved to more shelter spot outside – but still had trouble with the wind. Ross had to try and take his shots in the brief gaps between the the wind gusts.

The banner tags were cut on the Big Shot using the new Chalk Talk Framelits and stamped with letters from the Morning Post Alphabet stamps – Inspire in Strawberry Slush, Create in Pool Party and Share in Pumpkin Pie. The other images on the banners came from the Mosaic Madness stamp set. There are some strips of Island Indigo Chevron Ribbon behind “Inspire” and behind them some more strips of Pool Party coloured crepe filter paper strips.

As you can see – it was hard to take photos that didn’t have something moving or spinning. So we moved inside to try our luck there.

The bookshelf provided a good backdrop and I tried sitting, standing – even walking through the frame!

2013_08_24_JaxinFrame_stepthru

A bit hard to see in the photos – but there are some banners made from the Champagne Glimmer paper punched into 1/2″ circles and strung on Whisper White Baker’s Twine. I stuck these and all the banner peices on with Sticky strip – just as well considering the wind workout they got!

2013_08_24_JaxinFrame_sitting

Hope these have put a smile on your face – we certainly had a few laughs taking them!

Logo 72pt

Until next time

Jackie


Project Supply List:

Ink: Pool Party (pad 126982, Ink Refill 122933), Strawberry Slush (pad 131178, Ink refill ), Daffodil Delight (pad 126944), Pumpkin Pie (Pad 126945)      

Stamps:  Morning Post Alphabet (Wood:132042, Clear:126592), Mosaic Madness (Wood:130246, Clear:130249)      

Card/Paper: Whisper White (106549), Creped Filter Paper (129393), Champagne Glimmer Paper (127885), Quatrefancy Specialty DSP (130141)

Accessories: Whisper White Baker’s Twine (124262), Sticky Strip (104294), Island Indigo Chevron Ribbon (131151)

Tools: Stampin’ Spritzer (126185), Brayer (102395), Floral Frames Collection Framelits (127012), Chalk Talk Framelits (129983), Big Shot (113439), 1/2″ Circle Punch(119869), Mosaic Punch (131267)

Permanent link to this article: https://creativejax.co.nz/2013/08/create-inspire-share-frame/

Newest Digital Downloads from Stampin’ Up!

Get the Newest Digital Download for MDS from Stampin' Up!

Get the Newest Digital Download for MDS from Stampin’ Up!

Yeah it’s Tuesday again and we know what that means – new Digital Downloads for MDS!

This weeks selection includes some images that are included in the about-to-be-released Holiday Catalogue – check out the Thanksgiving and Halloween sets.

My favourite though would have to be the new photobook template – it will be great to record the school choir trip to Hawaii from a couple of years ago. I might finally get to share some of the magnificent phots from an amazing trip.

You can also get a pdf with more details here


Permanent link to this article: https://creativejax.co.nz/2013/08/newest-digital-downloads-from-stampin-up/

Elegant Engagement

We recently got to celebrate the engagement of Tim and Laura – my nephew and his gorgeous fiancé. Laura has an great food blog and her first cookbook is due for release later in August. (Check out her blog at www.hungryandfrozen.com if you’re a foodie).

This was the second engagement we have been lucky enough to celebrate this year.  My niece Emma and her fiancé Simon celebrated with families and friends a few months ago. Exciting times!

Our gift to Tim and Laura was a “vintage-look” noticeboard – it was padded material with a vintage wallpaper print framed in an antique styled frame – all in neutral shades. Check out Stampin’ UP!’s neural palette in the annual catalogue on pages 144/145. The gift itself provided all the inspiration I needed to make a card! 

Engagement Card watermark

I layered two pieces of Very Vanilla cardstock onto my Early Expresso base. One piece had been run through the Bigshot in the Beautifully Baroque Embossing Folder which had been inked with the Chocolate Chip ink pad – I love the effects that inking up embossing folders creates. In this case it matched the gift we were giving so well. The second piece of Very Vanilla had been stamped with “En Françias” in Sahara Sand to provide a subtle background onto which I stamped “Congratulations” from the Sassy Salutations stamp set. I used a range of varying shades of browns (Early Expresso, Chocolate Chip, Soft Suede and Crumb Cake) to create a graduated effect. I place a piece of Chocolate Chip Grosgrain ribbon across the join. Since I made the card, our the new 2013-2014 Annual Catalogue has been released and this ribbon has retired.


Engagement card embellishment watermark

The frame embellishment on the front of the card has three layers. The bottom layer was created using the Rectangular Frame from the Designer Frames Embossing Folder which I cut out and sponged to “age”. The middle layer used the inked Beautifully Baroque embossing folder again – though using Crumb Cake this time. The hearts are from the Hearts a Flutter stamp set – perfect for an engagement card I thought – so I just had to put them on the front of my envelope as well. The envelope flap also got the inked embossing folder treatment!

I’d had such fun with these colours and the effect they had that I decided to carry the theme through to the wrapping. Beth had made our Christmas wrapping paper last year by stamping onto newsprint – so we took it one step further and using sheets which had been scrunched a little (to give that vintage look), Beth stamped “Congratulations” in Early Expresso, “En Françias” in Crumb Cake, the “Beautifully Baroque Embossing Folder” in Soft Suede and the “Heart” in early Expresso all over the paper. So cool!

Engagement gift with Watermark

And of course any present is enhanced with the addition of a flower!

Engagement Flower embellishment  watermark

I sure enjoyed sharing this with Tim and Laura – and we had a wonderful celebration with their families and friends.

It has been a privilege to be part of both of these celebrations and reminded Roy and I of ourselves when we got engaged all those years ago. We celebrated our 27th wedding anniversary earlier this year so that was some time ago!

Emma & Simon and Tim & Laura – here’s wishing you a lifetime of love and happiness and the opportunity to make wonderful memories together. 

Ah – love is a wonderful thing!

Until next time

Jackie


Project Supply List:

Ink: Early Expresso (pad 126974, Chocolate Chip (pad 26979), Soft Suede (pad 126978), Crumb Cake (126975)      Stamps: En Françias (Wood 128562, Clear Mount 127790), Sassy Salutations (Wood 132070, Clear Mount 126707), Hearts a Flutter (Wood 131922, Clear Mount 129252)        Card/Paper: Early Expresso (121686), Very Vanilla (106550)     Accessories: Dimensionals (104430)     Tools: Beautifully Baroque Embossing Folder (130917), Big Shot (113439)


Permanent link to this article: https://creativejax.co.nz/2013/07/elegant-engagement/